The Windows rollback loop is a startup error that happens with Windows 10 and Windows 11 where you end up stuck in a continuous loop. You see a blue screen asking if you want to exit and continue to Windows or troubleshoot, and it also asks you to pick your keyboard layout and language. No matter how many times you restart your PC, you get brought back to this blue screen.
Before you think about restoring, resetting, or reinstalling your operating system, try this solution. It might just help you fix the Windows rollback loop problem and let you get back into your Windows without having to restore or rollback.

Page Contents
What can cause the Windows rollback loop issue
- Damaged or missing system files can stop Windows from loading properly and causes the rollback loop error.
- Disk errors from bad sectors or physical damage can mess with Windows’ ability to read or write data.
- Wrong or damaged boot parameters can confuse Windows and stop it from booting.
- An interrupted or failed Windows update can cause the operating system to get stuck in the rollback loop if it wasn’t installed correctly.
- In some rare cases, hardware or drivers that don’t work well with your system can cause the rollback loop issue, especially if they mess with important system functions.
How to fix Windows rollback loop after update
To fix this problem, you need to run a few commands to check and fix system files, disk errors, and boot parameters. You will need to use the command prompt in the Windows Recovery Environment, also known as Windows system recovery mode.
See also: Windows 11/10 “Choose your keyboard layout” Loop
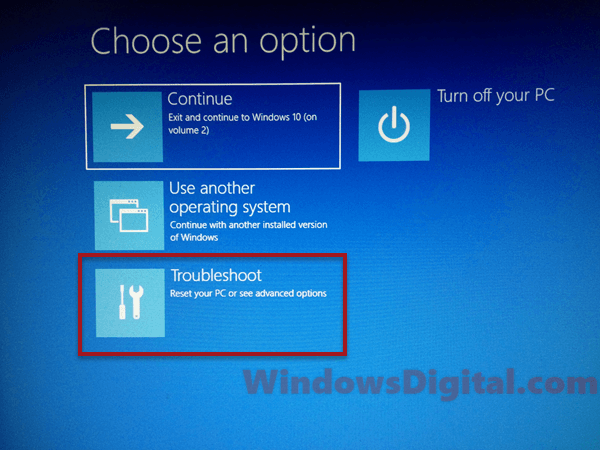
To get into Windows system recovery mode, press F8 while booting your PC. If F8 doesn’t work, try F11. If neither key works, do this: Hold and press the power switch of your computer for 5 seconds until it’s completely off. Start it up again. As soon as it starts loading Windows, hold and press the power switch to force another shutdown. Repeat this three times. When Windows sees that the startup failed multiple times, it will automatically boot into Windows recovery mode.
Once you’re in the recovery mode, do the following:
- In recovery mode, pick Troubleshoot.
- Choose Command Prompt.
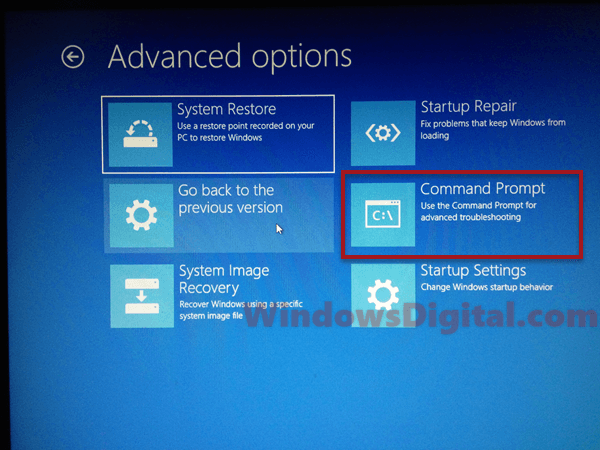
- Type these commands, hitting Enter after each one. If your Windows isn’t on drive C:, replace “C:” with the right drive.
chkdsk c: /f
sfc /scannow
bootrec /fixmbr
bootrec /fixboot
bootrec /rebuildbcd
bcdboot c:\windows /s c:
- If your computer doesn’t restart by itself after the commands, restart it. If you see an “access denied” message while running any commands, make sure you’re using the correct drive letter for your Windows installation.
Other things you can try
If nothing works to resolve the issue and you’re running out of solutions, you can try the following in extreme cases (usually as last resorts).
- System Restore: Use System Restore to go back to a state before the error. This needs you to have a saved restore point.
- Reset your PC: If you don’t have a restore point or the system restore didn’t work, you can reset your PC. This will reinstall Windows, and you can choose to keep or remove your personal files. But you’ll need to reinstall apps and programs.
- Windows Startup Repair: Use the built-in Startup Repair tool to automatically find and fix problems that stop Windows from starting.
- Perform a clean installation: If none of the above methods work, you might need to do a clean installation of Windows 10 or Windows 11. This will delete everything on your PC, so be sure to back up your important files first. To do a clean installation:
- Create a bootable USB drive with the Windows 10 or Windows 11 installation media using the Media Creation Tool from the Microsoft website.
- Put the USB drive into your PC and boot from it.
- Follow the on-screen instructions to install Windows, making sure to choose the “Custom: Install Windows only (advanced)” option when asked.
