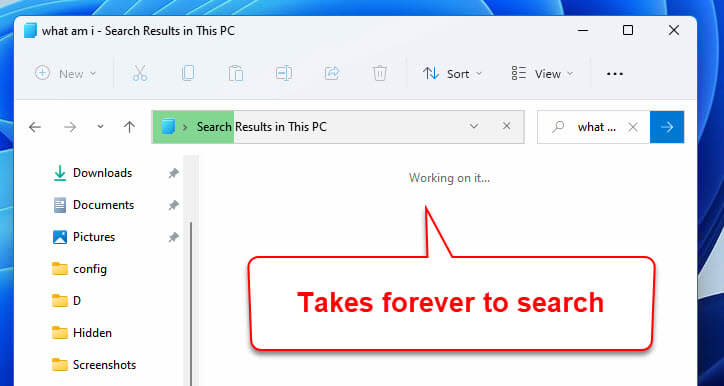
If you often search your PC using the search bar on the Start menu or File Explorer in Windows 11, you may sometimes feel that the search is unusually slow, taking too long to produce any result (constantly showing “Working on it…”).
It is especially the case if you are searching for a newly created file, or file from a newly installed software. There can also be times when you are certain the file you are looking for does exist on your computer, but the Start menu or File Explorer search just couldn’t find it.
Similar issue: File Transfer Speed Very Slow or Drops to Zero in Windows 11
The major reason that is causing slow search or file not found issue when using the Start menu search or File Explorer in Windows 11 is that the files or folders you were searching for may not be indexed yet. Search Indexing is a Windows feature designed to make finding things on your computer much faster by creating an index of your files. It’s like the index in the back (or the front) of a big book. It lets you find the contents much easier.
By including the files and folders in the index, it makes searching for these files much faster because Windows doesn’t have to search through all your files every time. Conversely, searches will be significantly slow when querying items is not in the indexed locations.
This guide will show you how to speed up search in Start menu or File Explorer by enabling Enhanced search mode and including any file, folder or directory you want to the index in Windows 11.
Also see: How to Search for Files in Windows 11 Start Menu Search
Windows 11 Start menu or File Explorer Search is too slow
Page Contents
Change “Find my files” to Enhanced instead of Classic
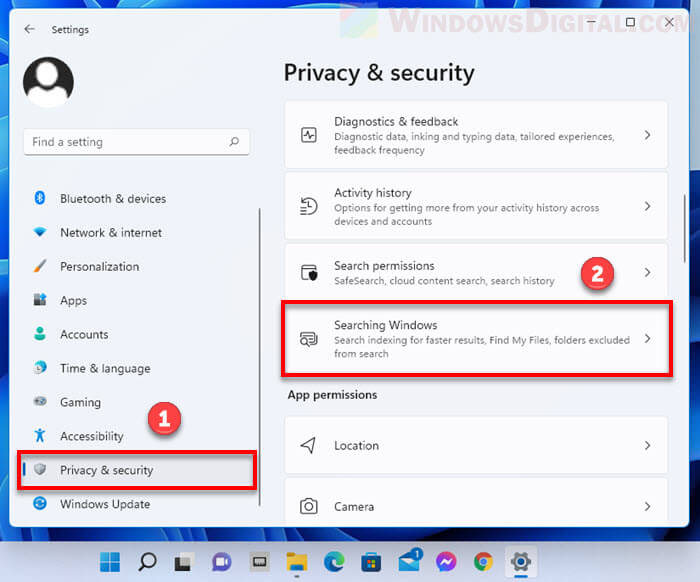
1. To access the “Find my files” setting, press Win + i keys to open Settings and navigate to Privacy & security > Searching Windows.
2. In the “Searching Windows” settings, click Find my files to expand it, then select Enhanced.
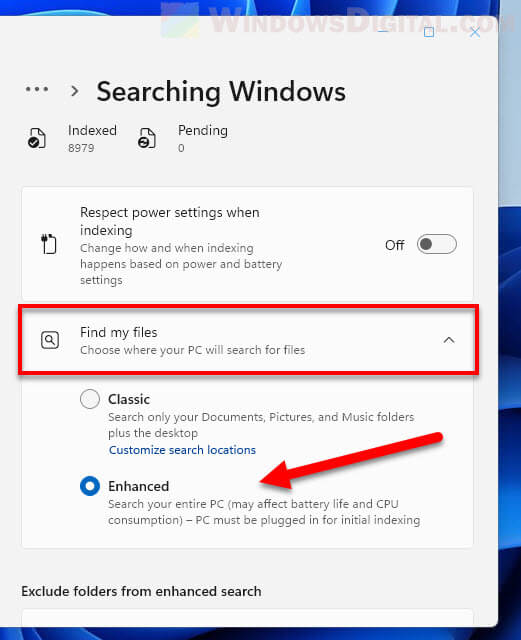
After selecting the Enhanced option, Windows 11 will begin to index your files. The search indexing will run in the background when your PC is idle. The process may take hours up to several days to complete depending on the amount files and folders you have on your computer.
Useful tip: How to Search for Text in Files on Windows 11
What is the difference between Classic and Enhanced search in Windows 11
The Classic option is selected by default in Windows 11. When Classic is selected, Windows will only index your user profile’s folders such as Documents, Pictures, Music folders, desktop, etc. It will not index other files and folders elsewhere on your computer. Thus, whenever you search for a file that is not in the indexed locations, the search will take an extensively long time to complete because Windows has to search through all the files for it.
The Enhanced option, however, will allow Windows to index the entire PC which includes every file and folder on all your connected hard disks, except for folders in the “exclude folders from enhanced search” list.
However, Enhanced search mode doesn’t index contents of a file. It will only index basic properties of an item. What this means is that when you search for a file by its name, Windows will be able to find it extremely fast because the name is a property of the file that has already been indexed. But if you search for the file using words within the contents of the files, you may not find the file or the search may take extremely long to produce any result.
To solve this, you can manually add the directory or folder to the “Indexing Options” to have all of its contents indexed.
Related guide: How to Search Only Video Files in Windows 11
Manually add folders to the index for faster search speed in Windows 11
To allow faster search speed even when you search the contents of the files in Enhanced search mode, you can manually add the folders or directories to the index via Indexing Options in Windows 11 so that Windows will index everything including the contents in the selected directories. To manually include folders to the search index, follow the steps below.
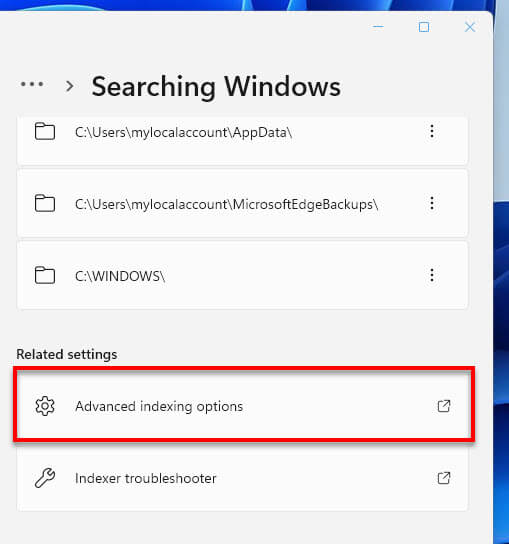
1. Open Settings and navigate to Privacy & security > Searching Windows. Under Related settings, select Advanced indexing options.
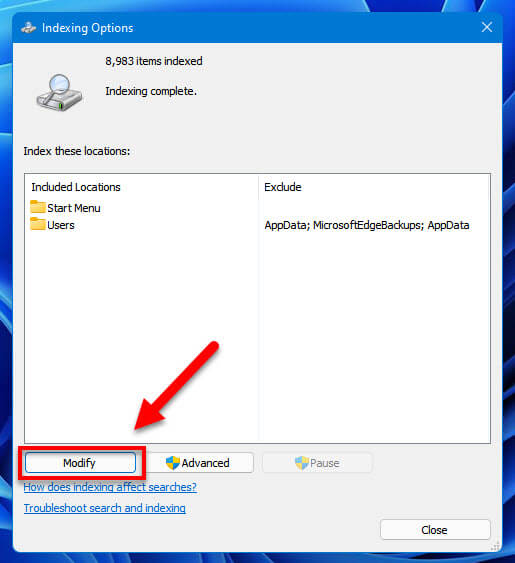
2. In the Indexing Options window, click the Modify button.
3. In the Indexed Locations window, to add a location (folder or drive) to the search index, select the checkbox for the location you want to add. For example, to add a folder within C: drive, expand C: drive and select the folder you want to include. To include an entire hard disk drive, select the checkbox for the drive. Every files and subfolders in the selected folder or drive will be included to the search index.
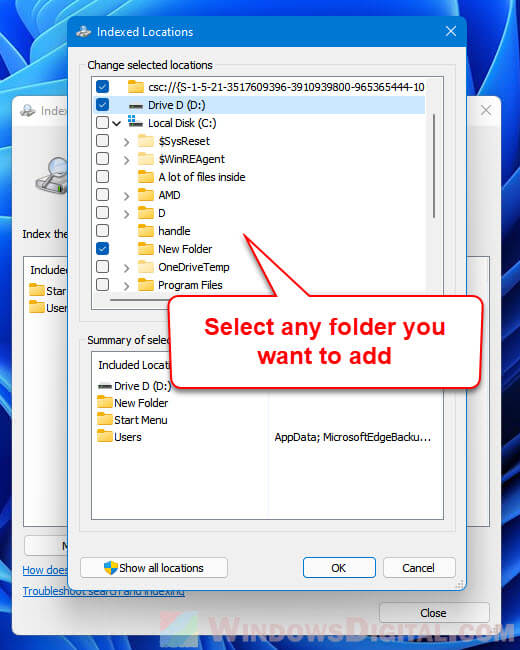
4. Click OK to save the changes. The search indexing will begin to run soon after you select any new location. You can close the window. The indexing process will run automatically in the background.
Recommended resource: Change Windows 11 Start Menu Default Search to Google
Note that the process to index folders this way is very resource intensive and may take days to complete if you include hundreds of gigabytes of files to be indexed. However, the indexing will only run when Windows detects that your computer is in idle mode – when you are not doing anything at all.
After the indexing of the locations is completed, you will be able to search for those files by its name, other property or even contents within in on the Start menu search bar or File Explorer, and Windows should be able to find them extremely fast.
Exclude folders from enhanced search
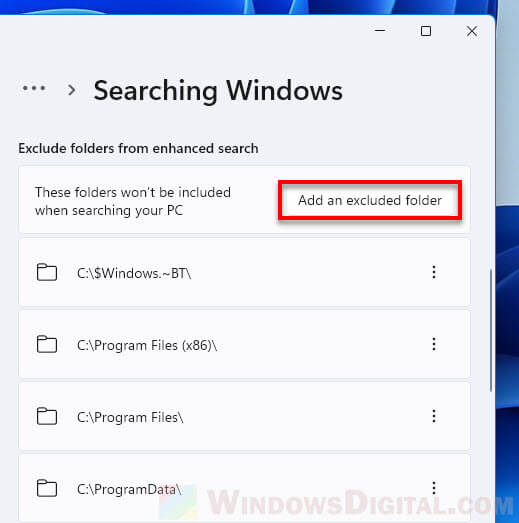
If you select Enhanced search mode, you can exclude any folder from being indexed by adding the folder you want to exclude to the “Exclude folders from enhanced search” list in Settings > Privacy & security > Searching Windows.
Windows 11 Search Indexing troubleshooter
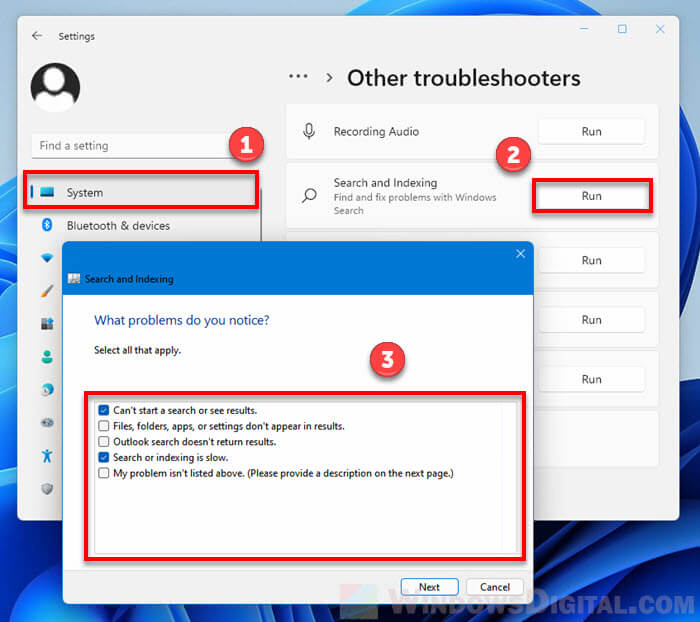
If you encounter other search related issues such as unable to start a search or see any search result, search or indexing too slow, etc. when you search using the search bar in Start menu or File Explorer in Windows 11, try to use the indexer troubleshooter to troubleshoot the problem.
You can open the Search and Indexing troubleshooter via Settings > System > Troubleshoot > Other troubleshooters.
