If you have closed every application and program and still see an abnormally high memory usage through the Task Manager, this guide will show you what you can do to reduce the RAM usage in Windows 11.
Also see: Service Host Local System High CPU and Memory Usage in Windows 11
Page Contents
High RAM usage when no program is running
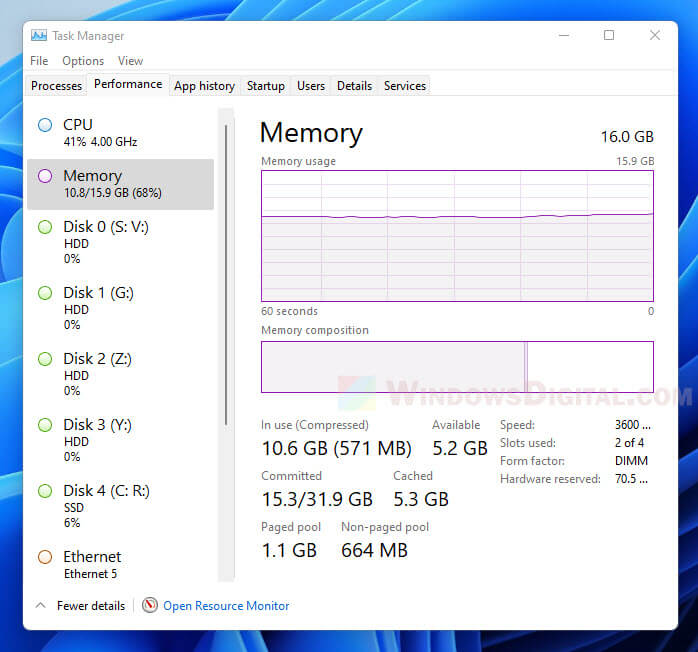
Depending on how much RAM your computer has, it is perfectly normal to see 40-60% RAM usage when nothing is running and your computer is idle. That is because these amount of RAM is required to operate the Windows system even when no other app is running.
That is also why Microsoft sets a minimum requirement of 4 GB RAM for Windows 11. Even though it is the minimum memory requirement to run Windows 11, you will need 8 GB or more RAM to run the OS smoothly.
Clear RAM cache
When you run an app, Windows will use some of your computer’s RAM as cache so that when the app request the same data, it can be retrieved quickly.
However, when you close the app, Windows will sometimes retain the stored RAM cache. This is so that when you open the same app again, the same data can be retrieved quickly, making the app to launch and run faster because the same data is still in the RAM cache.
If you are seeing an abnormally high RAM usage when nothing is running, you may want to try to clear the RAM cache to quickly free up some RAM. To learn how to clear RAM cache, read: How to Clear RAM Cache in Windows 11.
Disable Tips and Suggestions in Windows 11
As suggested in many forums and Reddit posts, the tips and suggestions feature in Windows could very likely be the cause of why RAM usage is so high when nothing is running. Disabling the feature may help significantly reduce RAM usage while idle. There is no downside to disable the feature unless if you want Windows to offer you tips and suggestions from time to time.
To disable tips and suggestions in Windows 11, follow the steps below.
- Press Win + i to open Settings.
- On the left pane, select System, and then select Notifications on the right.
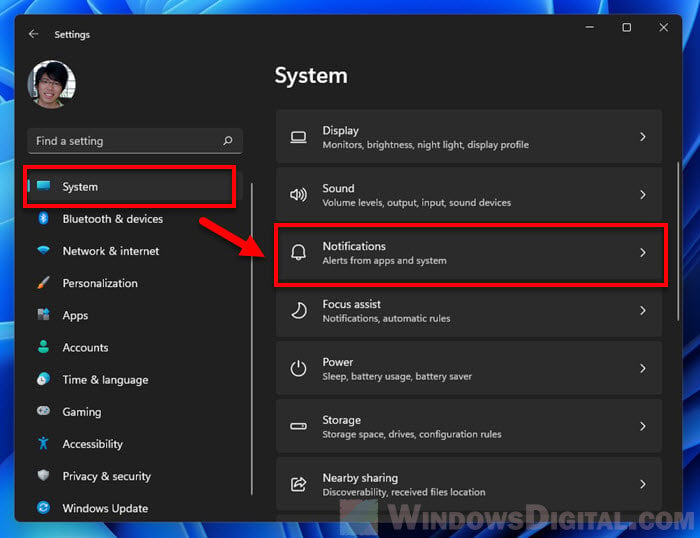
- Scroll down to the bottom of the setting page and disable the following options.
- Offer suggestions on how I can set up my device
- Get tips and suggestions when I use Windows
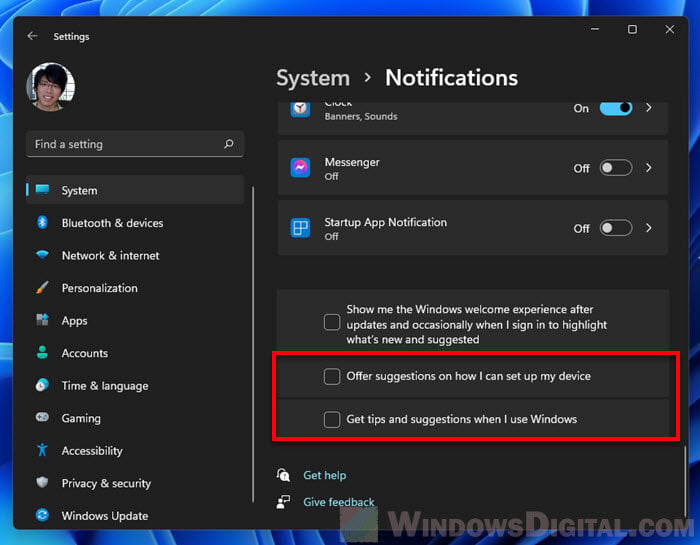
- Restart your computer for changes to take effect. You should now see lesser RAM usage when your computer is idle.
If you would also want Windows 11 to stop showing you the welcome experience usually after updates or occasionally when you sign in, disable the option for “Show me the Windows welcome experience after updates and occasionally when I sign in to highlight what’s new and suggested“.
Suggested read: How to Know Which App is Using The Internet in Windows 11
Disable Superfetch
Service Host Superfetch is a feature in Windows that predicts which applications you will use at which times, and then preloads those programs into your RAM so that they can be loaded faster. In most cases, Superfetch improves the performance of your Windows as certain apps can be loaded faster this way.
However, Superfetch can sometimes cause more harm than it fixes. It is a notable culprit for certain problems such as abnormally high memory, CPU and disk usage when nothing is running. Slowdowns caused by Superfetch typically result from it preloading too many apps into your RAM, for example, guessing wrong and loading too many apps that you are not going to use.
Learn more: How to Disable Superfetch and Prefetch in Windows 11
If you notice that your RAM is being used up by nothing or if you experience significantly high CPU and disk usage even when your computer is idle, try to disable the Superfetch feature.
To disable Superfetch in Windows 11, follow the steps below.
- Search for and open “Services” via Start.
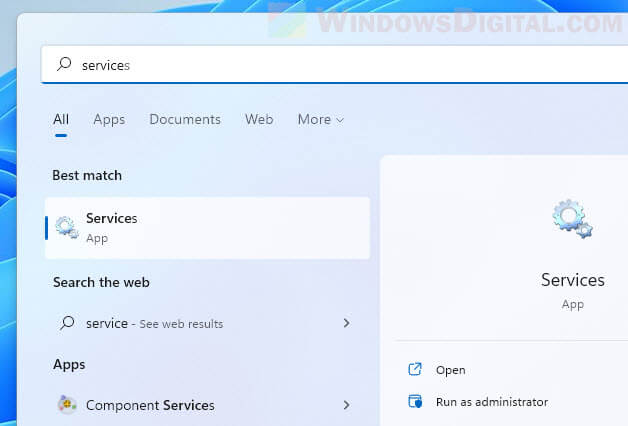
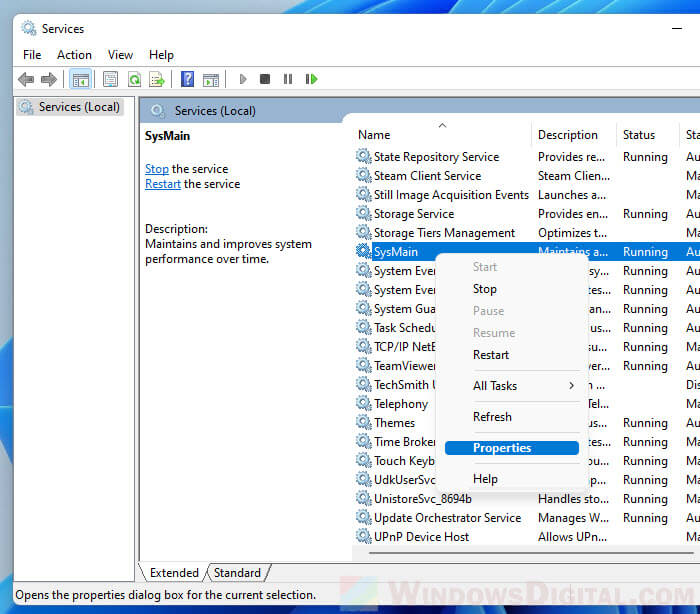
- On the right pane, look for a service called “SysMain“. Once found, right-click it and select Properties.
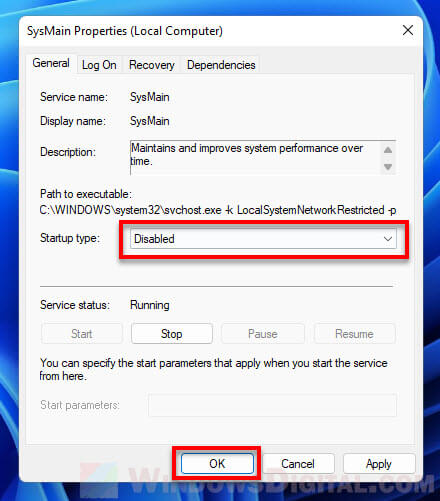
- In the SysMain Properties window, click the drop-down menu for Startup type and select “Disabled“.
- Click Apply then OK to save the changes.
- Restart your PC for the changes to take effect.
Related: GPU 100% Usage When Idle or Gaming (Good or Bad)
Disable unwanted third party services
Some apps and programs will keep some of its services running in the background even when the app is not actually running. Some of these third party apps’ background services will run on startup.
If any of such third party background services is continuously hogging your computer’s resources, you may see a high RAM usage when no program is actually running. You can check if there is any third party services that you don’t need and disable it via the System Configuration.
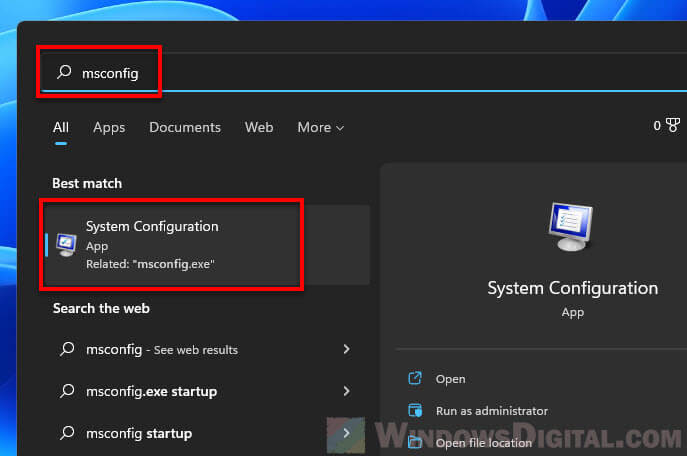
- Go to Start and type “msconfig“. Select and open “System Configuration” from the search result.
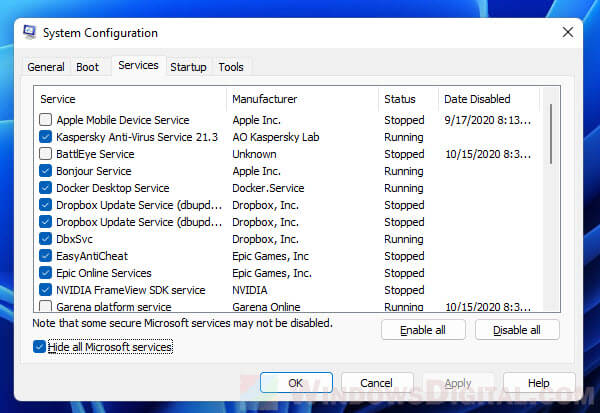
- In the System Configuration window, select the Services tab.
- Enable the checkbox for “Hide all Microsoft services” so that you don’t accidentally disable necessary system services.
- From there, you can see a list of third party services that will be run on startup. Disable any service that you don’t recognize or you no longer need.
Disable unwanted startup programs
Beside disabling unwanted background services, you may also want to check if there is any unwanted program that is set to run on Windows startup. If an app or program is set to run on startup, it will run itself automatically as soon as you sign into Windows.
To check and disable startup programs in Windows 11, read: How to Disable Startup Programs in Windows 11.
Scan your PC for malware or viruses
It’s needless to say that if your computer is infected by malware or viruses, anything can happen. For example, a malware can run resource-heavy tasks in the your computer’s background without your knowledge and continuously causing high RAM usage when nothing is running.
Perform a full scan using your antivirus software to check for potential threats that may be the culprit of high RAM usage problem while no program is running on your computer.
