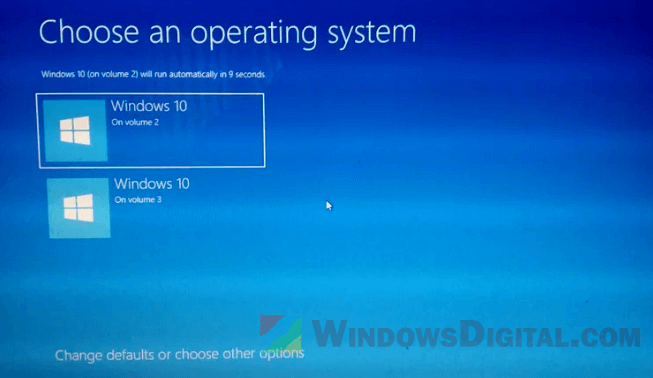
If you see the “Choose an operating system” screen when you start or restart your Windows 11 or Windows 10 computer, it means you have more than one Windows installed. This screen lets you pick which version of Windows you want to start. This guide will help you stop the “Choose an Operating System” screen from showing up when you turn on your computer.
Even if you have wiped your main hard drives, this screen will keep showing if there’s another Windows on different parts of your hard drive that weren’t wiped. But you don’t have to wipe your drive to get rid of this menu. You can just remove the old Windows from the boot menu, so your computer only starts with your current version. This stops the “Choose an operating system” screen from popping up when you start your computer.
How to remove the “Choose an Operating System” screen
If you use only one Windows version, you can remove the old Windows installations that you no longer use from the boot option list. Doing so will inform Windows that there is only one Windows version to boot from, so that there is no need for the “Choose an operating system” screen to appear. Follow the steps below to do so:
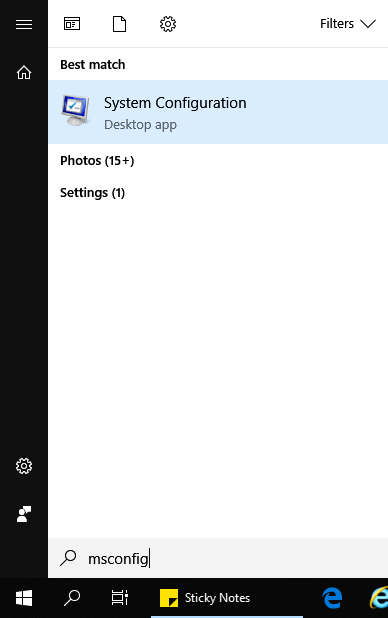
- Go to the Start menu or use Cortana. Type “MSCONFIG” to search for and open System Configuration.
- In the System Configuration window, go to the Boot tab.
- You should then see a list of Windows installations on different drives in your computer. Select the ones you no longer use and click Delete, until only the “Current OS; Default OS” remains.
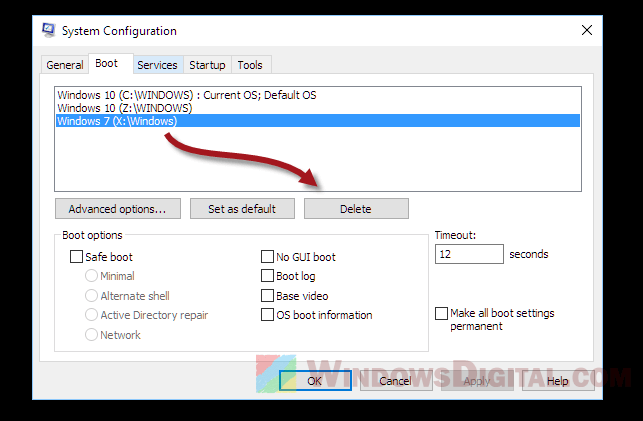
- Click Apply and restart your PC. The startup should now skip the “Choose an operating system” screen automatically.
If you find yourself stuck on this screen even if you have only one Windows installation, especially after a recent major Windows update, you can check this article that explains what might be causing the issue and how to potentially fix the problem: Windows Rollback Loop After Windows 10 Update (Fix).
Other boot issues and workarounds for Windows 11 or 10
Sometimes, the standard method might not work. Here are other ways you might face boot problems and how to fix them:
Manually edit the boot configuration data (BCD) file
If the “System Configuration” method doesn’t work, you can try to change the Boot Configuration Data (BCD) file yourself. Here’s how to that:
- Right-click the Start menu, pick “Windows Terminal (Admin)”, and choose “Command Prompt.”
- Type
bcdeditand hit Enter. - Find the boot entry you want to remove and note its identifier.
- Type
bcdedit /delete IDENTIFIER, replacing “IDENTIFIER” with your note from step 3. - Restart your PC to see if the screen has been removed.
Fixing the Master Boot Record (MBR)
If the Master Boot Record (MBR) is damaged, you can try the following steps to fix it:
- Start your PC with a Windows installation media (USB or DVD).
- On the Windows Setup screen, click “Next.”
- Click “Repair your computer” at the bottom left.
- Select “Troubleshoot” > “Advanced options” > “Command Prompt.”
- Type these commands one after the other, pressing Enter after each:
bootrec /fixmbr
bootrec /fixboot
bootrec /scanos
bootrec /rebuildbcd
- Restart your PC and check if the boot issue is fixed.
Resetting your PC
If nothing else works, you might need to reset your PC. This brings your Windows back to how it was when it was new. Just remember to save your important files first, and only do this as a last resort.
