If you see checkboxes (tick box, check mark) on each of your files and folders icons on the desktop or in File Explorer, this guide will show you how to remove the checkboxes from the icons in Windows 11.
![]()
Why is there a check mark on my desktop icons?
The check mark, or often known as check box or tick box, on icons is a feature in Windows that allows users to quickly select or highlight multiple files and folders by clicking on the check boxes of the items. This feature is called “Item check boxes”. If this feature is enabled, all icons on your desktop and files and folders in File Explorer will have check boxes on them.
You can disable the feature to get rid of the check boxes from your files and folders icons in Windows 11. Follow one of the two methods below to do so.
The Item checkbox feature is disabled by default in Windows 11. If you know you didn’t enable the feature but the checkboxes suddenly started appearing on files and folders icons in File Explorer and on the desktop, one of your programs may have altered the settings and enabled the item checkbox feature.
How to get rid of the checkbox in Windows 11
The item check boxes feature is an optional feature that some users may find useful when selecting or highlighting multiple files. If you don’t need the feature and want to get rid of the check boxes from desktop icons and items in File Explorer, here’s how to disable the item check boxes feature in Windows 11.
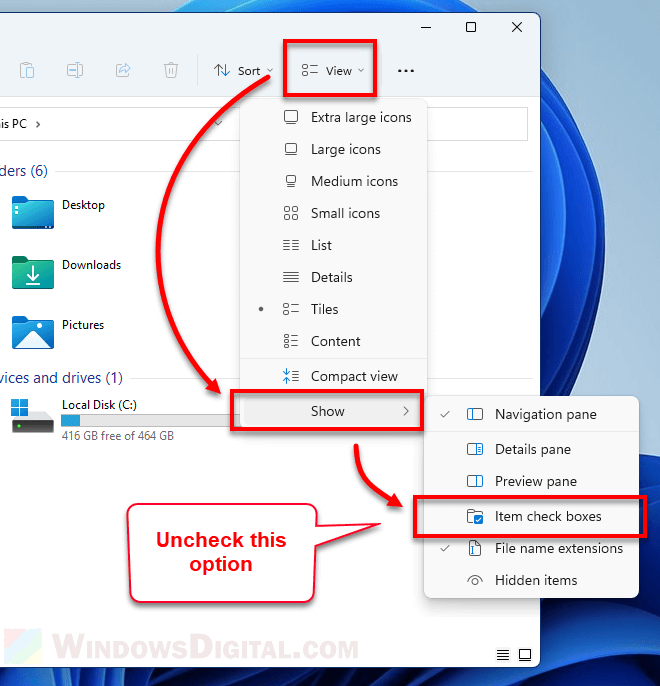
- Open File Explorer or This PC in Windows 11.
- On the menu bar, click on View.
- Hover your mouse over Show.
- Then, uncheck the option called “Item check boxes“.

Once the feature is disabled, the check boxes on all icons will disappear.
To turn on the check boxes in Windows 11, simply repeat the steps above and enable the “Item check boxes” feature.
Disable item check box feature via Folder Options
If that doesn’t work to remove the check boxes from icons on your Windows 11, here’s another method to disable the item check boxes feature via the Folder Options in File Explorer.
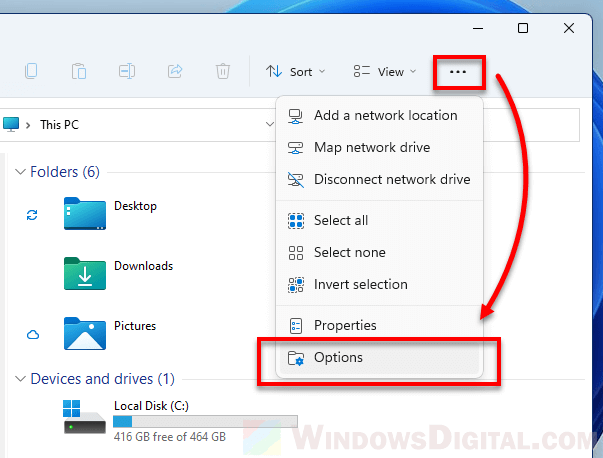
- Open File Explorer.
- Click on the triple dotted icon at the top right corner of the window.
- Then, select Options.

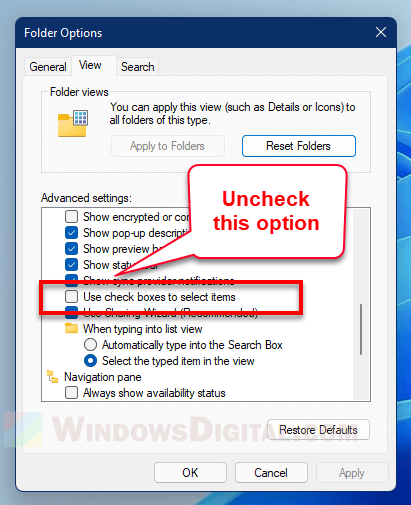
- In the Folder Options window, click on View tab.
- In the Advanced settings column, scroll down and look for an option called “Use check boxes to select items“.
- Uncheck to disable the option.

- Click Apply, then OK to save the changes.
Both the “item check boxes” options mentioned in the two methods above are the same and correlated with each other. When you disable one, the other will be disabled too. So, you only need to follow one of the two methods above to enable or disable the “item check boxes” feature in Windows 11.


