If a game or app is using unknowingly high CPU usage and you wish you can reduce or limit how much CPU resource the process can use, this guide will show you how to limit the number of CPU cores a process can use in Windows 11 via Task Manager, and optionally how to permanently set a process to run on limited CPU core every time you start it.
Limit CPU usage of a process via Task Manager
In Task Manager, there is an option called CPU Affinity which you can set for each process to control how many or which CPU cores a process is allowed to use in Windows 11. Since most modern computer processors are multi-core processors, you should be able to see multiple cores in the processor affinity selection window. To limit CPU usage of a process in Windows 11, follow the steps below.
First, on the Windows 11 desktop screen, open Task Manager by pressing CTRL + SHIFT + ESC (Optional read: How to Open Task Manager From Taskbar in Windows 11).
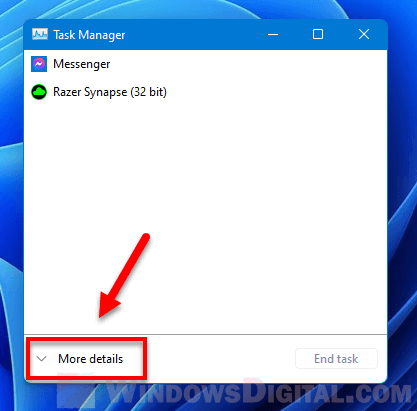
In the Task Manager window, if it’s in simplicity mode where you can’t see any tab but only a couple of apps with little to no information, click on More details to expand it.

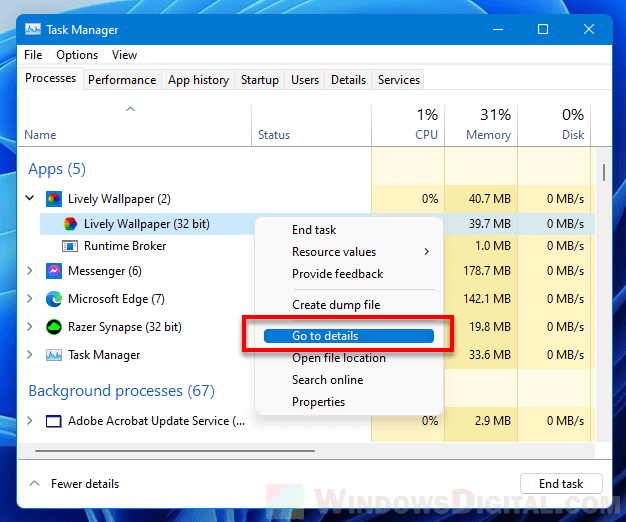
Under Processes tab, click on the app whose CPU usage you want to limit to expand the list of processes the app is running. Right-click on the process you want to limit, and select Go to details.

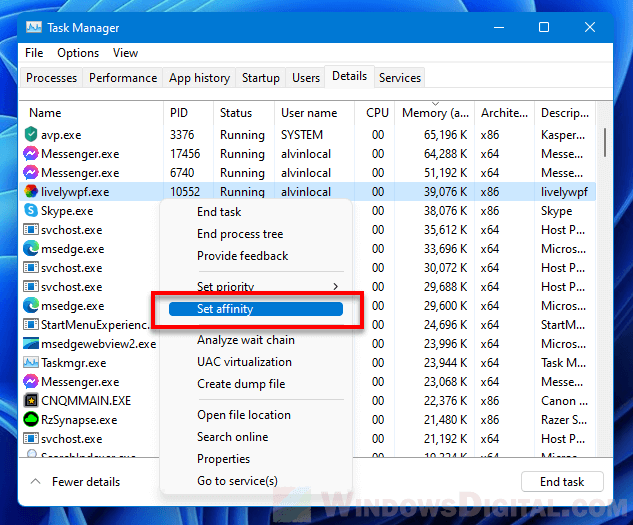
Task Manager will then direct you to the Details tab and highlight the executable process (.exe) of the app’s process you’ve selected earlier. Right-click on the highlighted process and select Set affinity.

Note: If you know and can pinpoint the .exe process of the app you want to limit in the Details tab, you can skip the Processes > Go to details part. You can go directly to the Details tab instead and select the process whose CPU usage you want to limit.
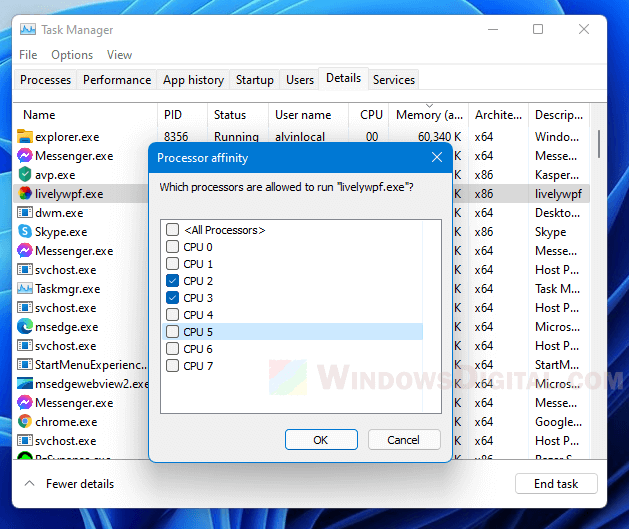
In the Processor affinity window, by default, for most processes, you should see all processors are selected which means all processor cores are allowed to run the process.

From there, you can select which CPU core the selected process can use by checking the checkbox of the CPU core you want to allow the app to use and uncheck the checkbox for CPU core you don’t want it to use. You can limit only one or multiple CPU core for a process, but at least one core has to be selected.
For apps that has multiple processes such as Chrome.exe, you will have to set the CPU affinity for each of the processes since each executable represents a different tab, window or plugin.
Limit CPU usage (Processor affinity) of a process permanently
If you limit the CPU usage of a process by setting its CPU affinity via Task Manager in Windows 11, after you close the app or game, the next time you open it, the CPU affinity of the process will be reset back to its default, which allow it to use “all processors” again.
Fortunately, there is a workaround to force an app or game to always start with your preset allowable CPU cores (CPU affinity) – by creating a shortcut that runs the app with CPU affinity parameters. You can read more about the workaround here: How to Set a Process CPU Affinity and Priority Permanently in Windows 11/10.
It may sound a little too complicated for people who are not very computer literate, but it’s definitely worth trying, especially if you often have to set the CPU affinity or priority for processes in Windows 11/10. Once you learn how to do it, it will definitely make your day much easier.


