Do you have an app you wish no one else can see or know that you’ve installed on the PC? Below are various approaches you can hide apps in Windows 11 from other users who have access to the same PC.
Page Contents
Hide apps from other users in Windows 11
If you want to hide an app in Windows 11 so that other users can’t find out the app was ever installed or exists on the computer, while retaining the way to launch it from the folder where it was installed, here are some tips on how you can achieve that.
- Firstly, hide the app from desktop by deleting its shortcut icon from the desktop.
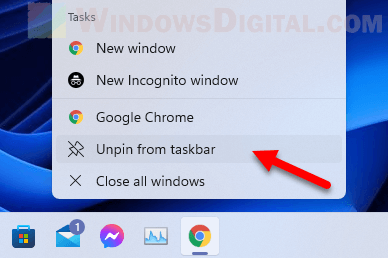
- Unpin the app from taskbar and Start menu if it was pinned. To do so, right-click the app on the taskbar and select Unpin from taskbar.
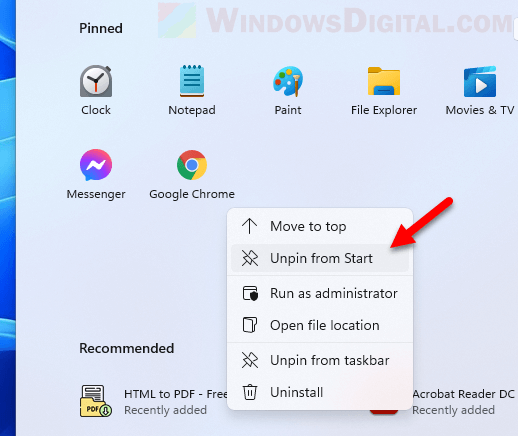
 If it was also pinned to Start, open Start and locate the app from the Pinned list. Right-click the app and then select Unpin from Start.
- Next, hide the app from Windows 11 Start menu Recent apps, All apps list, Recommended and Search.
- Optionally, you can also hide the app from Apps & Feature in Windows 11 Settings so that it won’t appear as an installed app on the list of apps in both Settings and Control Panel.
See below for detailed guide on how to implement step 3 and 4.
After you’ve removed all the shortcuts of the app from the desktop, start menu, apps & features, etc, generally the only way to open the app is by going to its installation folder and launch the exe file directly from there.
How to hide apps from Windows 11 Start menu
Hide an app from the “Most used” and “All apps” list
The reason an app appear in these lists in the Windows 11 Start menu is that there is a shortcut of the app in the Start menu programs folders which register the app to the Start menu. If you delete the shortcut of the app from the said folders, the app’s existence in the Start menu will be removed.
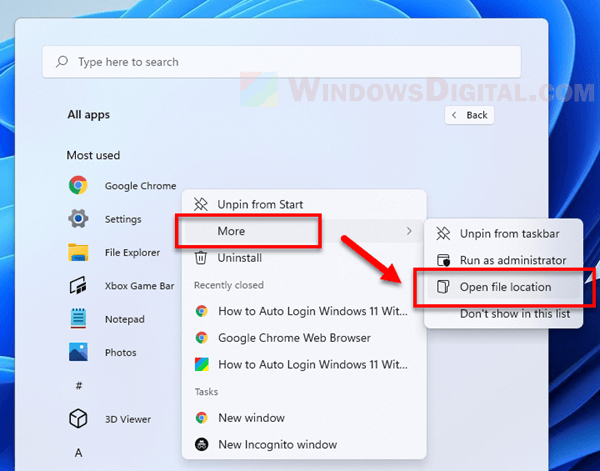
To locate the Start menu programs folder, click on Start menu. Right-click on the app from the all app list and then select More > Open file location. We will use Chrome as an example here and assume we want to hide Chrome from the Start menu.
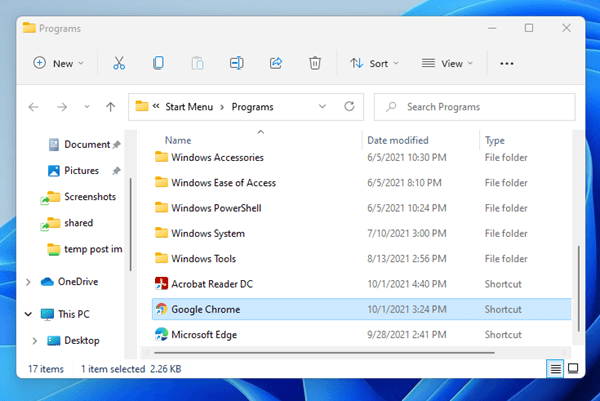
Depending on whether the app was installed for all users or limited to only your user account, you may be looking at one of the following directories.
C:\ProgramData\Microsoft\Windows\Start Menu\Programs
%appdata%\Microsoft\Windows\Start Menu\Programs
Once located, delete the shortcut of the app from the folder.
You may also want to check the Desktop folder of the Public user to see if there is also a shortcut of the app created in the folder.
C:\Users\Public\Public Desktop
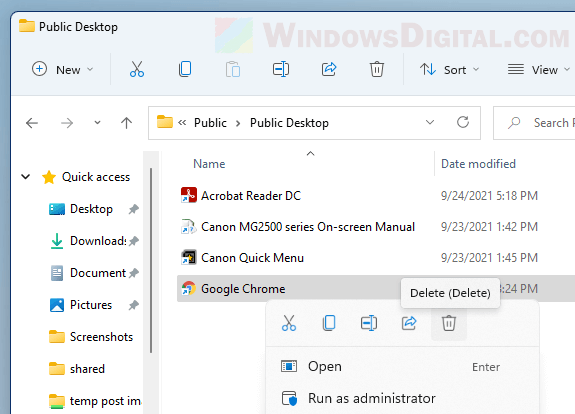
Now, try to check the list of Most used apps, All apps or Recommended in the Start menu. The app should be gone from these lists.
Removing the app’s shortcuts from the said directories will remove its existence from the Start menu, particularly the app lists, recent apps, etc. However, if a user search the app by its name, the Search could still find the app if a shortcut of the app exists somewhere else (on Desktop or in other folders) or if there is another way to launch the app. For such apps, you can’t hide it from the search results unless if you uninstall it.
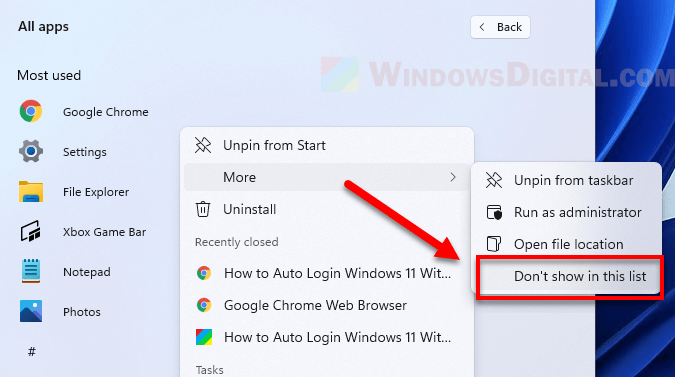
Tip: If you only want to hide an app from the Most used list, you can simply right-click on the app from the Most used list and select More > Don’t show in this list.
Hide app by choosing how the Start menu shows apps
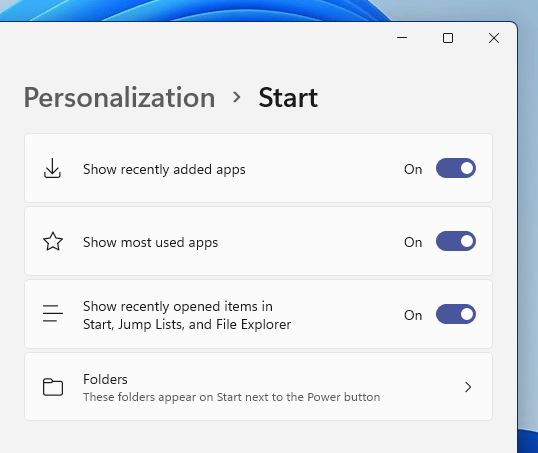
Another method of hiding apps from the Start menu is by configuring the settings of how Windows 11 should show apps on the Start menu.
In Windows 11, press Win + i keys to open Settings. Navigate to Personalization > Start. From there, you can enable or disable the following settings.
- Show recently added apps.
- Show most used apps.
- Show recently opened items in Start, Jump Lists and File Explorer.
Hide apps from Apps & Features and Control Panel in Windows 11
Optionally, you can also hide the app from the list of apps in the Apps & Features settings so that other users will not know the app was ever installed. By doing so, all users, including you, will also not be able to uninstall the program.
The following instruction involves editing the Windows Registry. Note that editing registry can cause serious problem and may potentially corrupt your operating system if done incorrectly. It’s highly recommended that you make a full backup of your Registry before making any changes. Please proceed at your own risk.
First, open Registry Editor by typing “regedit” in the Start and press Enter. In Register Editor, navigate to the following key.
HKEY_LOCAL_MACHINE\SOFTWARE\Microsoft\Windows\CurrentVersion\Uninstall
Under Uninstall, locate the folder for the app you want to hide. If you can’t find the app’s folder from this key, it likely means that your app was installed as 32-bit but you’re using Windows 11 64-bit. In that case, try to go to the following key instead.
HKEY_LOCAL_MACHINE\SOFTWARE\Wow6432Node\Microsoft\Windows\CurrentVersion\Uninstall
After locating the folder for the app, right-click on the folder, select New, then DWORD (32-bit) Value (In the screenshot below, we selected Google Chrome as an example).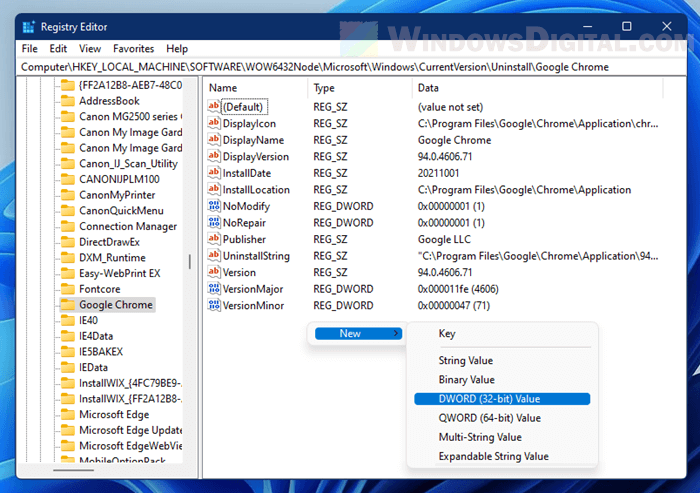
Name the new value as SystemComponent. Then, right-click on the new value and select Modify. Enter 1 in the Value data field and click OK.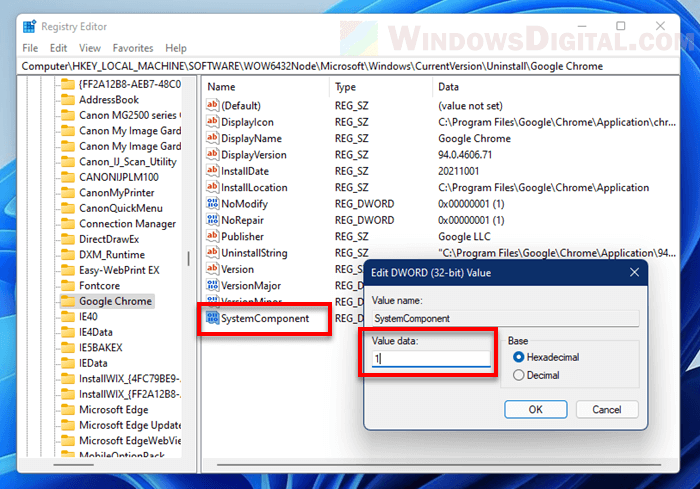
Now, try to find the app in the Apps & Features app list again. It should return “We couldn’t find anything to show here“. The app will also be removed from the list of programs in the Add or remove programs in Control Panel.


