Back in Windows 10 or older, users can easily switch between audio output devices by simply clicking on the speaker icon on the taskbar and selecting an output device. In Windows 11, however, when you right-click on the speaker icon on the taskbar, it will no longer show the option to directly change the sound output device.
You will now have to go through one more step by either going into the sound settings and change the default audio output device from there, or by changing it via the Windows 11 new quick settings area on the taskbar.
Pro tip: How to Change Output Device For Different Apps on Windows 11
Page Contents
How to change sound output device on Windows 11
Only one audio output device can be used at a time on Windows 11. If you have multiple sound output devices such as speakers and headphones connected to your PC, you can choose only one device at a time to play sound in Windows. To switch between the audio output devices, for example, from speakers to headphones or vice versa, follow the steps below.
Method 1 – via Sound settings:
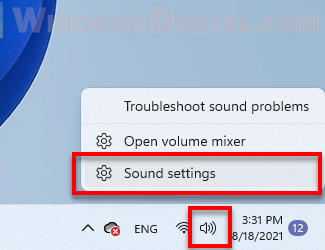
- On Windows 11 desktop, right-click on the speaker icon on the taskbar and select Sound settings.
- Under Output and “Choose here to play sound” options, select the audio device you want to use as the default sound output for all applications and Windows system.
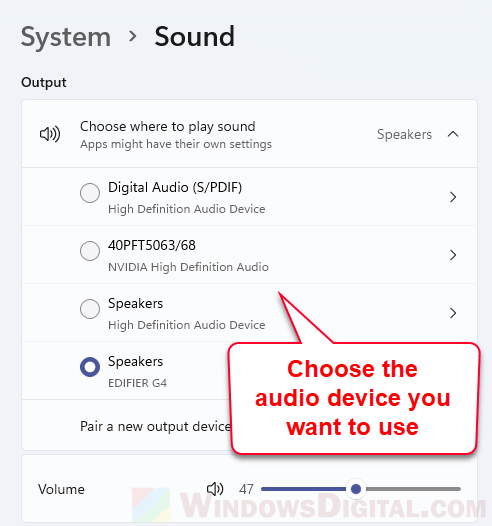
- The change will be effective immediately upon switching.
Method 2 – via Quick settings:
- On Windows 11 desktop, left-click on the speaker icon (or network icon) to open the quick settings.
- Next, click on the right arrow beside the volume control slider bar.
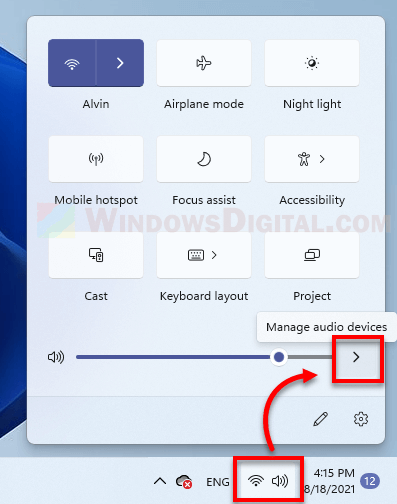
- All detected audio output devices will be listed here. From here, you can select the sound output device you want to use as the default output device for Windows and apps.
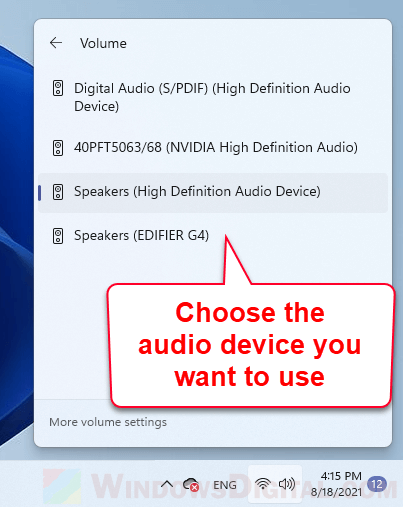
Though the default audio output device you select via any of the two methods above will apply to most applications and games, some apps might still have their own settings and might use a different sound output instead. For such apps, you may need to manually change the audio output device the app uses from the settings within the app itself.
If you want to disable any audio output/input devices that you no longer use, or enable any previously disabled audio devices, you can do so via the old sound control panel. Read: How to Open The Old Advanced Sound Settings in Windows 11.
How to change audio input device on Windows 11
Similar to output device, only one audio input device can be active at a time on Windows 11. If you have more than one source of sound input such as multiple microphones, you can select which device Windows should use for speaking and recording.
- Follow step 1 in the instruction above to open Sound settings in Windows 11.
- Under Input and “Choose a device for speaking or recording“, select an audio input device that you want Windows to use as the default recording device for all apps and programs.
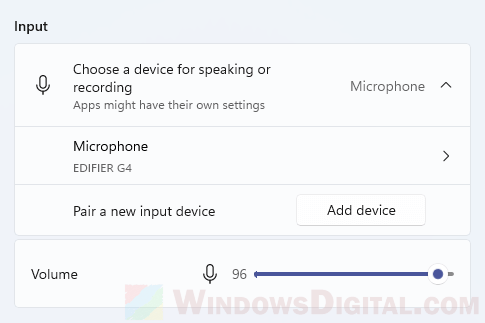
Some apps might have their own settings on which microphones to use (such as Discord). If an app is not using the default microphones you’ve selected via the Windows sound settings, try to look for the sound input settings from within the app itself and change it from there.
Alternative method to change from speakers to headphones or vice versa on Windows 11
Alternatively, another workaround to quickly switch from speakers to headphones or the other way round is by first setting the headphones to be the default audio output device when it’s connected. Then, you can manually switch it on when you want to use it, or switch it off when you want to stop using it.
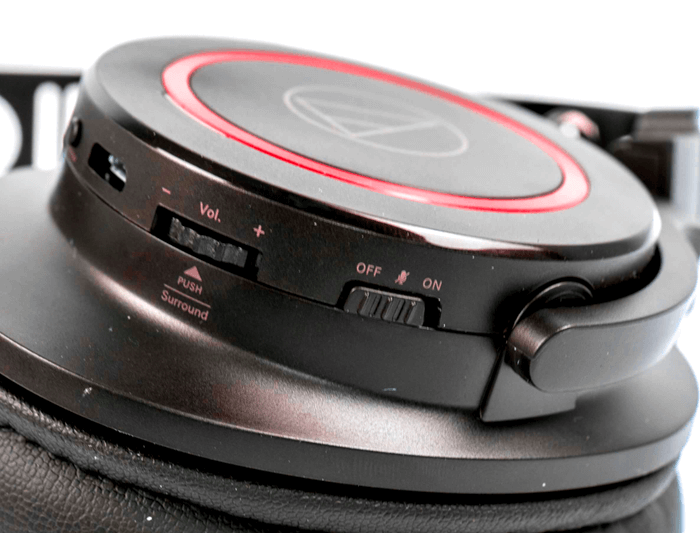
This is assuming your headphones has a physical switch which you can turn it on or off. If the headphones is set as the default device, when you switch it on, Windows will automatically detect it and use it as the main audio output device. When you switch it off, since the device is no longer detected, Windows will attempt to use your secondary sound output device instead (if exists) such as your speakers.
