There are plenty of reasons why you might want to block a website so that your computer cannot access the website. To prevent your children from accessing certain websites you don’t want them to such as YouTube, or to prevent any software or program from accessing a particular website on its own, you can set up a website blocking at operating system level to block all access from your PC to the website.
Though there are many ways to block a website in Windows 11, depending on what you want to achieve, you can block a website at browser level, use the Windows parental control, or block a website entirely at operating system level using the hosts file.
In this guide, we will show you how to block a website at operating system level using the hosts file in Windows 11 so that no app or program can ever access to the website you choose to block.
Also see: How to Block Adult Websites in Windows 11
How to Block a Website with Hosts file in Windows 11
The hosts file is a Windows system file located in C:\Windows\System32\drivers\etc. This file handles mappings of IP addresses to host names in Windows 11. For instance, if you want the host name example.com to resolve to the 127.0.0.1, you can add the mapping to the hosts file so that when any application requests to visit example.com, it would go to the IP address 127.0.0.1 instead of querying the DNS.
With the ability to map any website to any IP address you want using the hosts file, you can map a website you want to block to an IP address that is inaccessible, for example, 127.0.0.1. 127.0.0.1 is often used to refer to the local host, which is your own computer.
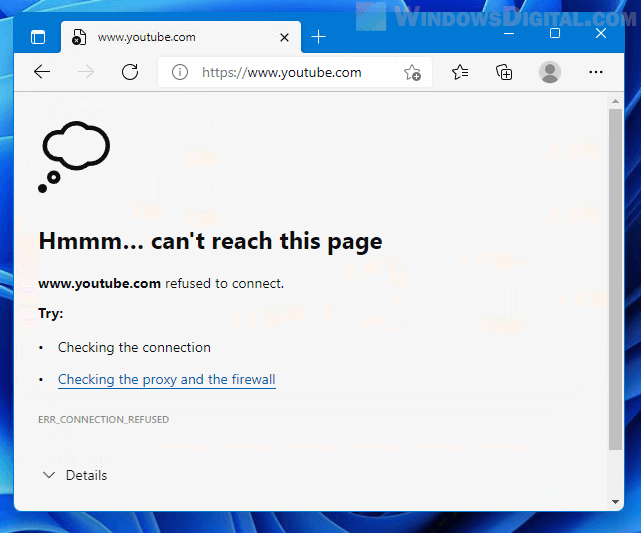
Thus, when you map a website to this IP address, it will access itself, which will return a blank page or connection refused error if the website does not present at your computer.
To block a website with hosts file in Windows 11, follow the steps below. Note: You need to have a user account with administrative privileges in order to make changes to the hosts file.
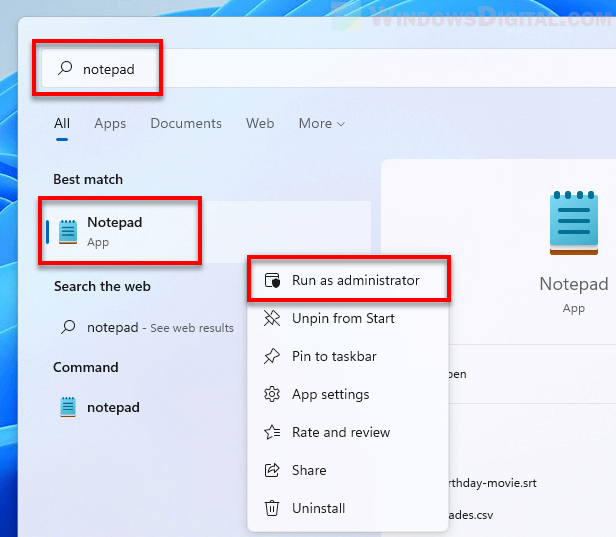
1. First, click Start and search for “Notepad”. Right-click the first result – Notepad, and select Run as administrator to open Notepad with administrative privileges.
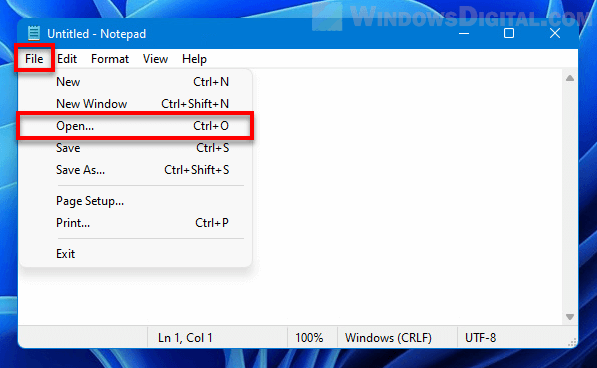
2. Next, click File and select Open, or simply press Ctrl + O in Notepad.
3. Browse to the directory: C:\Windows\System32\drivers\etc. Replace C: if your Windows is installed on other drive. If you see the “No items match your search” message in this folder, it indicates the Open window is currently only showing for TXT files.
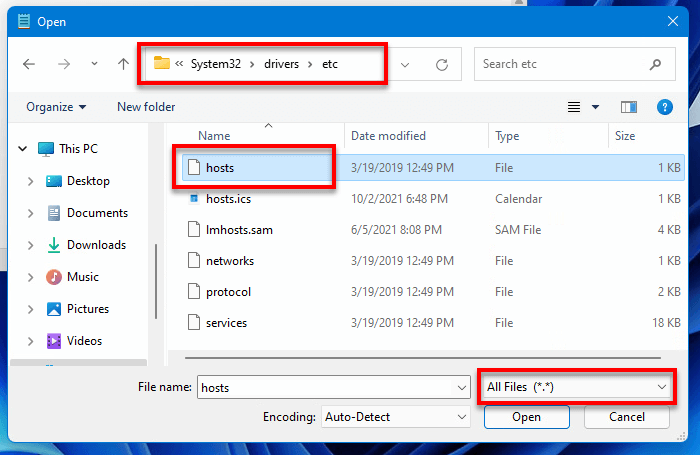
Since the hosts file is not a text nor any other extension file, you need to change the Open window to show all files instead for the hosts file to be visible. Click the drop-down menu next to “File name” and select All files to do so. Then, select the hosts file and click Open.
4. Once you’ve opened the hosts file in Notepad, to block let’s say YouTube, on a new line, enter 127.0.0.1, followed by a space or Tab, then enter www.youtube.com. This will resolve www.youtube.com to 127.0.0.1 when an app on your computer requests to visit www.youtube.com. If you want to block Facebook, enter “127.0.0.1 www.facebook.com” on a new line.
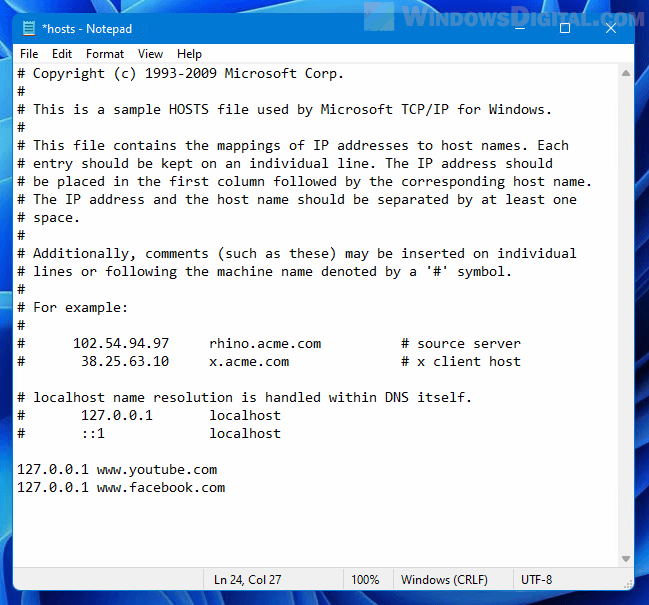
5. Click File > Save or press Ctrl + S to save the hosts file after editing. Then, restart your computer for the changes to take effect. It’s important because without a reboot, the changes in the hosts file will not be loaded and you will still be able to access the website you’ve blocked.
Related: How to Block Websites on Chrome Without Extension
After setting up the blocking in the hosts file and restarting your PC, when you open the website in let’s say Chrome browser, Chrome will return the “This site can’t be reached” error.
Unblock a website you’ve previously blocked in hosts file
To unblock a previously blocked site via hosts file, follow the same steps above to open hosts file using Notepad with administrative privileges. Remove or comment (#) the line of the website’s IP mapping you wish to unblock and save the hosts file. Restart your PC for the changes to take effect.
Things to note
If your hosts file has other mappings of IP addresses to host names, it’s best to leave them as they are and don’t edit them in any way. Enter the mapping you want to add on a new line at the bottom of the hosts file. In addition, make sure there is only one mapping per line because Windows will only understand one mapping per line.
Don’t comment out the line you actually need in the hosts file. Commenting is a programming term used to nullify or ignore a line in a program. In the hosts file, the # symbol is used to comment a line to ignore the line.
Also, make sure to save the file as it is, without any extension. A hosts file does not and must not have an extension, otherwise it won’t work and may cause all previously set up mappings to stop working.
If you save the hosts file after editing and it returns access denied error, it means that you did not open Notepad with administrative privileges (run as administrator) and that it does not have the required permissions to edit the file. Make sure to follow step one in the instruction above to open Notepad as administrator first before opening the hosts file.
