This guide will show you how to setup auto login in Windows 11 so that you don’t have to enter your password or PIN whenever you start up your PC. This will allow your PC to skip the login screen and boot right into Windows desktop screen automatically.
It works by setting up an automatic login which authorizes Windows to automatically sign into your user account with your password without your manual input every time you start your computer. You can setup auto login for only one user account per Windows.
Note: This is not a guide on how to bypass login without a password. This method does not help you to get into any Windows without knowing the user account’s login credentials. If you’ve forgotten your password, you should instead click on the “I forgot my password / pin” on the Welcome screen to reset your password.
How to setup auto login in Windows 11
By enabling auto login in Windows 11, you allow Windows to automatically login to your user account on every startup. This is not recommended if your PC is shared with others or will often be left alone where someone else can switch on your PC as it will automatically boot right into Windows without any login required.
To set up auto login in Windows 11, follow the steps below.
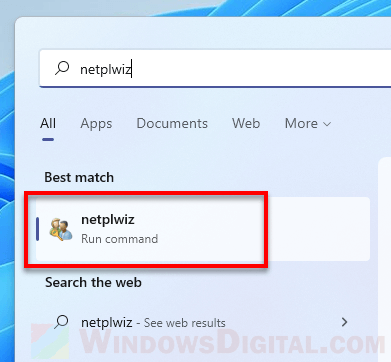
- On the Start menu, search for and open “netplwiz” – an advanced user account management tool in Windows.
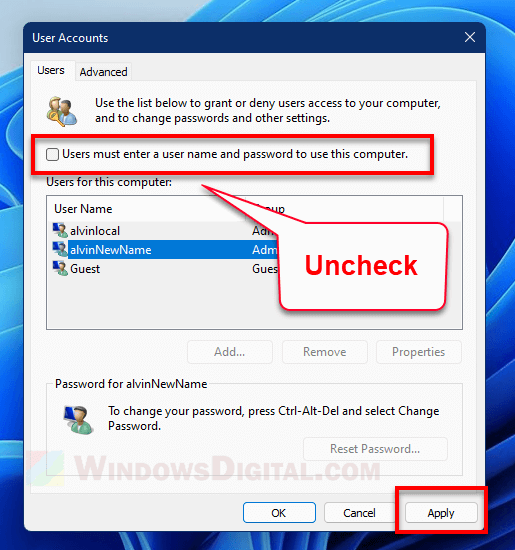
- In the User Accounts window, uncheck the checkbox “Users must enter a user name and password to use this computer“.
- Next, click on Apply.
- A new window called “Automatically sign in” will then prompt you to enter a user name and password. Type in the user name and password you used to login to Windows. Windows will use this saved login credentials to automatically sign into Windows on startup without you having to manually input the username and password again.
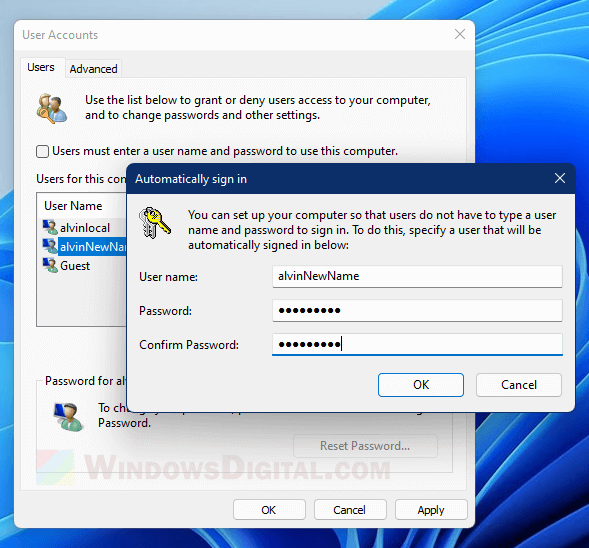
- Click OK to save the changes.
- Restart your PC and see that Windows auto login to the desktop screen without any action from your side.
If you are not sure what your username is, check on the list of user names under “Users for this computer” in the netplwiz window.
If you’re using a Microsoft account to login to Windows 11, enter your Microsoft account’s username instead, which is usually an email address, for example, [email protected].
Additionally, if your local account does not have a password, leave the password fields blank and just click OK to proceed.
Auto login in Windows 11 not working
If the auto login fails on Windows startup and still prompts you to enter your password or PIN on the welcome screen, you may have entered the incorrect password during the auto login setup. Check your password and repeat the steps above to setup the auto login again.
Note that you cannot enter PIN in the password field requested during step 4 in the username and password prompt. It won’t work and Windows will prompt you to enter your password again on next startup when the auto login fails due to incorrect password. If you have been using a PIN to login to your Windows, you would still need to enter the actual password of your user account to setup the auto login.
PIN is just an alternative login method in Windows and is not tied to your Microsoft account. It is only tied to your computer or device. In addition, a PIN does not replace the password of your user account.
If you’ve forgotten the password of your user account, in the netplwiz window, select your user account and then click on the Reset Password button to change your password.
How to disable auto login in Windows 11
Your PC will continue to automatically sign into Windows until you disable the auto login feature. To disable auto login in Windows 11, go to start, search for and open netplwiz.
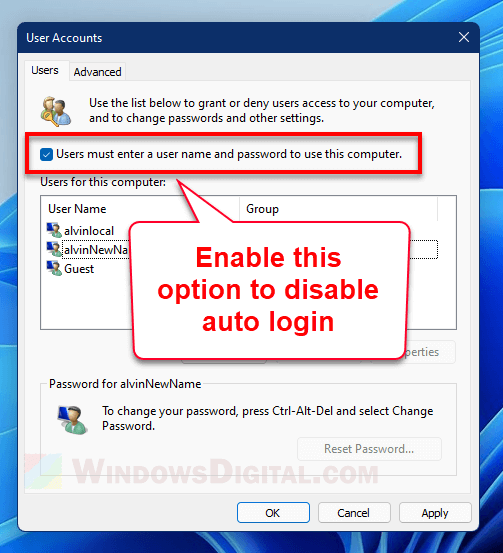
In the Netplwiz window, enable the checkbox that reads “Users must enter a user name and password to use this computer“. It tells Windows that users must to enter their login credentials in order to sign into Windows. Restart your computer and the welcome screen should start asking for password or PIN again.
