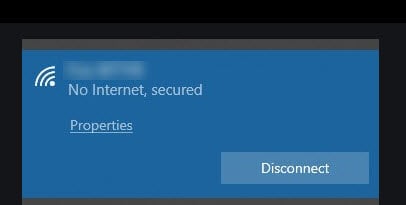
If your Windows 11 or Windows 10 laptop or desktop PC is connected through a WiFi connection and you randomly see “No Internet, Secured” connection error, this guide may be able to help you fix the issue.
Also see: Windows 11 WiFi Not Working But Ethernet Does, Why?
Page Contents
Why does it say “No Internet, Secured”?
The “No Internet, Secured” error in Windows 11 or 10 indicates that your computer is successfully connected to your local network and that the connection is secured, but no internet connection is detected. In some rare cases, the error may also appear even when you actually have internet connection, most of the time unstable internet connectivity.
Before we try fixing anything, there are a few things you should check:
- Make sure your PC is not currently on any VPN connection. If there is one, it is most likely the culprit of the issue.
- Check if it’s your ISP issue – if any of your other devices is able to connect to the internet using the same network, it means it’s not your ISP issue. If none is able to connect to the internet, it most likely indicates an ISP outage. Call your ISP (Internet Service Provider) if that’s the case.
- Make sure you are connected to the right WiFi network. Sometimes we may have accidentally connected to a neighbor or public network without realizing it and the network coincidentally has no internet connectivity.
- Try to restart your computer, router and modem all together. If the “No Internet Secured” error persists, try the solutions below.
Fixing the “No Internet, Secured” WiFi connection error
Follow the solutions outlined below to troubleshoot and resolve the “No Internet, Secured” issue in Windows 11 or 10. Usually, one of these solutions should effectively address the problem
Fix 1: IP release renew and flushdns via CMD
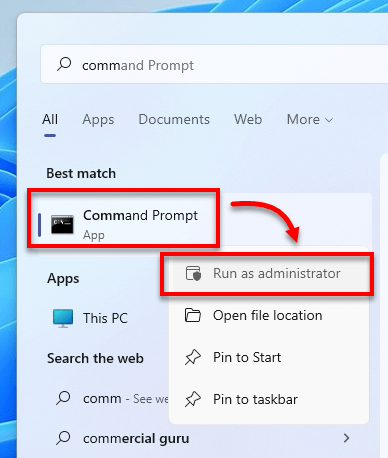
Open an elevated (Run as administrator) command prompt. The quickest way to open command prompt is by typing “cmd” in the Windows search bar, then right-click command prompt and select Run as administrator.
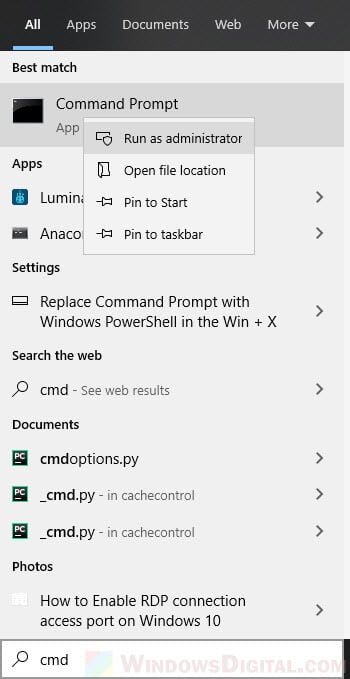
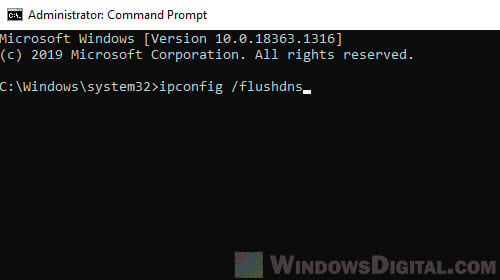
In the command prompt, type each of the commands below one line at a time.
ipconfig /release
ipconfig /renew
ipconfig /flushdns
Fix 2: Don’t allow Windows to turn off your Wireless adapter to save power
In Windows 10 or 11, there is a default power management setting that will allow Windows to turn off your wireless adapter device to save power. This feature exists with the purpose to save power mainly when your PC is at idle mode. But in many reports, the power management kicks in even when you are actively using your computer.
Thus, disabling the power management feature may solve the “No Internet, Secured” problem. Here’s how to do it:
- On Start menu, search for and open Device Manager.
- In the device manager window, expand Network adapters.
- Double-click on your wireless adapter device.
- Go to Power Management tab.
- Uncheck the option that reads “Allow the computer to turn off this device to save power“.
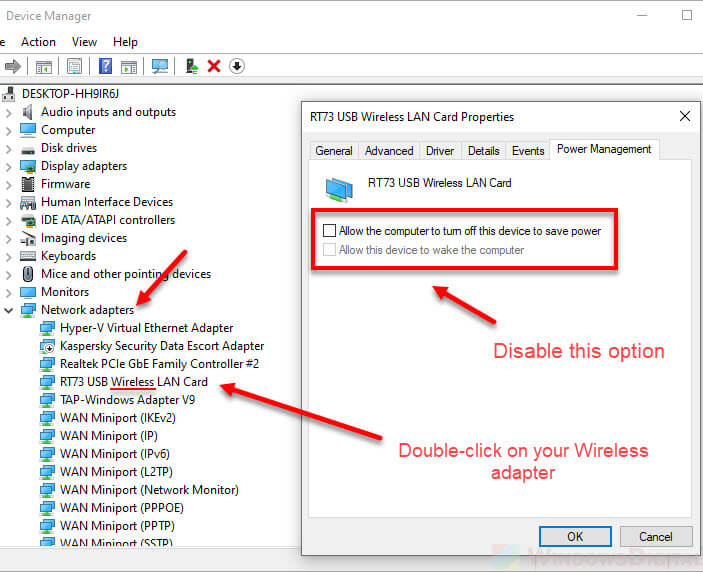
- Click OK to save it.
- Restart your PC and see if the “No Internet Secured” issue persists.
Fix 3: Try switching to 2.4 GHz instead of 5 GHz
The radio frequency of your computer’s selected WiFi could also be the culprit. If your router has dual band WiFi connections (meaning supporting both 2.4 GHz and 5 GHz), try to connect to the one with 2.4 GHz (the one without _5G in the WiFi name) and see if it resolves the issue.
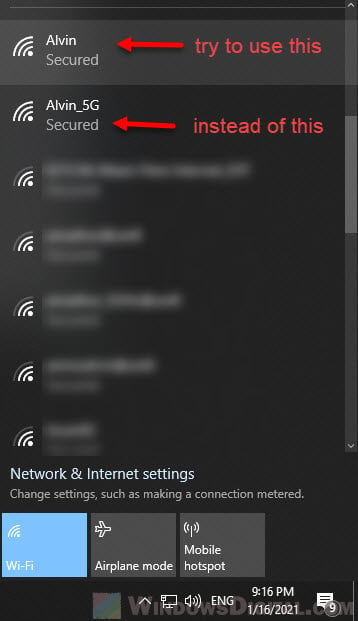
Some users who have Intel(R) Dual Band Wireless-AC 3168 wireless adapter or similar reportedly facing the “No Internet, Secured” issue and have fixed the problem by changing the preferred band to 2.4 GHz. The “preferred band” option can usually be found in Device Manager > Network adapters > double-click on your wireless adapter > Advanced tab.
Fix 4: Configuring Wireless adapter and USB Power Options
Some power options in Windows may interfere with wireless connection, thus causing the “No Internet, Secured” problem. Follow the steps below to change the relevant power options.
- In Windows, search for and open “Edit Power Plan” via Start menu.
- Click on “Change advanced power settings“.
- Make sure the currently active power plan is selected by making sure there is an [Active] word next to it.
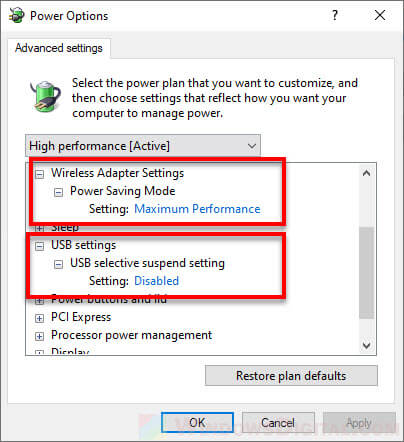
- Expand Wireless Adapter Settings > Power Saving Mode > Setting. Set it to Maximum Performance.
- If you are using a USB wireless adapter, also change the following option: Expand USB settings > USB selective suspend setting > Setting. Change it to Disabled.
- Restart your computer and see if you can connect to the Internet now.
Fix 5: Update your wireless network adapter’s driver
If you haven’t already tried to update the driver of your wireless network adapter, do so by following the steps below.
- Search and open Device Manager on the Start menu.
- Expand Network adapters.
- Right-click your wireless network adapter and then select Update driver.
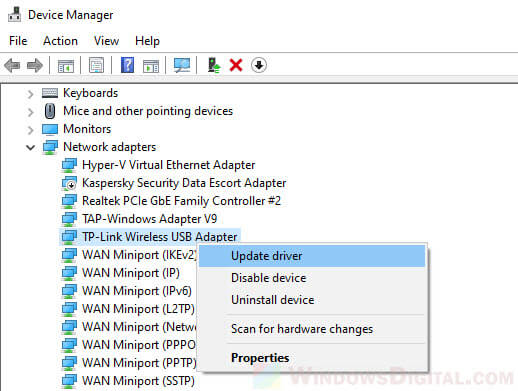
- Select Search automatically for updated driver software to allow Windows to search for the latest available driver for your wireless adapter and install it automatically.
- Once the driver update is completed, restart your PC and see if the “No internet Secured” issue is resolved.
Fix 6: Let Windows diagnose and troubleshoot the problems for you
Windows comes with a pretty useful tool that can spot and fix the network issues that might be causing the “No Internet, Secured” error. Just right-click the network icon on your taskbar and pick Troubleshoot problems. Windows will automatically find what’s wrong and try to sort it out.

The tool will check a bunch of common network issues, like any problems with your network adapter, your router or modem, or troubles coming from your internet service provider (ISP). If it finds anything off, it’ll try to fix it on the spot.
Keep in mind, though, this troubleshooter isn’t perfect—it might not always catch or fix every issue. If it doesn’t solve the problem, you might need to look at other solutions in this guide or get help from a tech expert or your internet provider.

