Ethernet network connection often refers to wired network connection which is usually connected using LAN cables. While the cause of any Ethernet related issue can be very vast and varied, the solutions are often the same. In this guide, we will show you several fixes and workarounds to fix Ethernet not working issue in Windows 11.
Also see: Windows 11 Ethernet “Unidentified Network” (How to Fix)
Page Contents
How to fix Ethernet not working in Windows 11
Fix 1: Check cable and restart
Let’s first go with the basic and general fixes first. One of the most common causes for Ethernet network to disconnect or simply not working in Windows 11 is cable issue.
- Check the LAN cable to see if there is any damaged part or excessively bent in any spot.
- Check to see if the connector is loose. Unplug and plug in the cable connector again on both ends – your computer and the router.
- If you have a spare LAN cable, try to replace the existing cable with the spare one and see if it works.
- Restart both your computer and the router/modem. To reboot a router, you can simply turn off its power and then turn it back on.
If everything checks out but the Ethernet connection is still not working, try the solutions below.
Related guide: How to Connect to WiFi Network on Windows 11
Fix 2: Update Ethernet adapter driver
A driver tells the operating system (Windows 11) how to work with a piece of hardware. Corrupted or outdated Ethernet adapter driver can cause issue and failing to establish a successful network connection. The following steps show you how to update Ethernet driver in Windows 11.
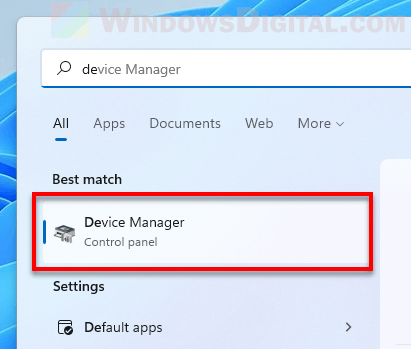
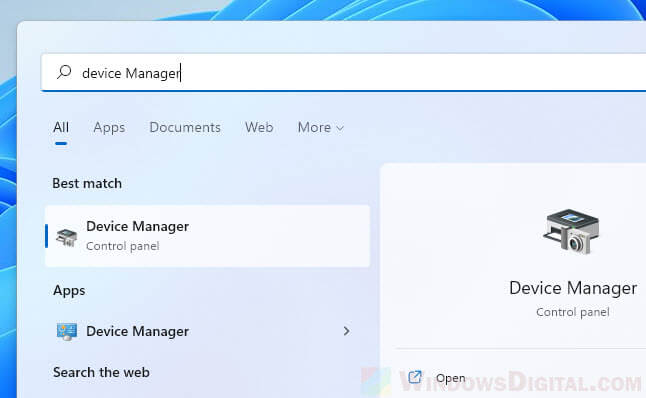
1. Search for “Device Manager” via Start and open it.
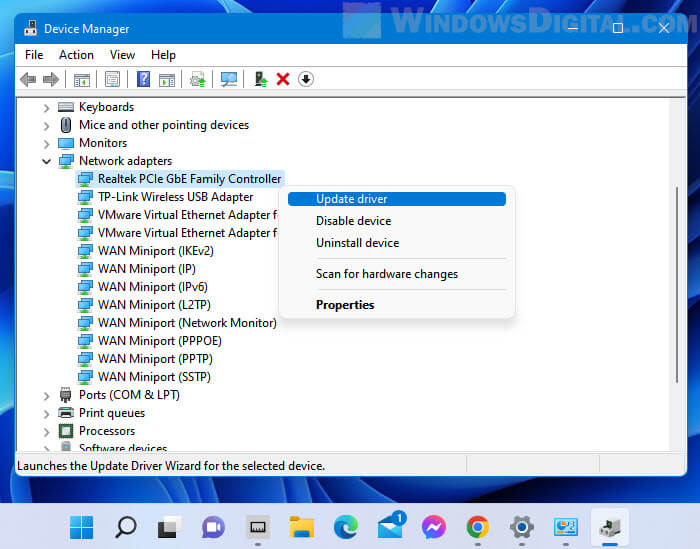
2. Expand the Network adapters category. Then, right-click your Ethernet adapter and select Update driver.
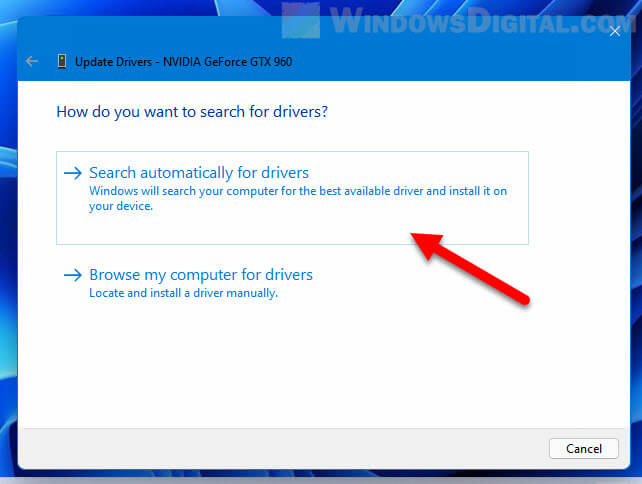
3. Next, select “Search automatically for drivers” to allow Windows to automatically search for the best available driver and install it for your computer.
4. If an update is installed, restart your computer and retry the Ethernet connection.
Also read: How to Update Realtek Drivers in Windows 11
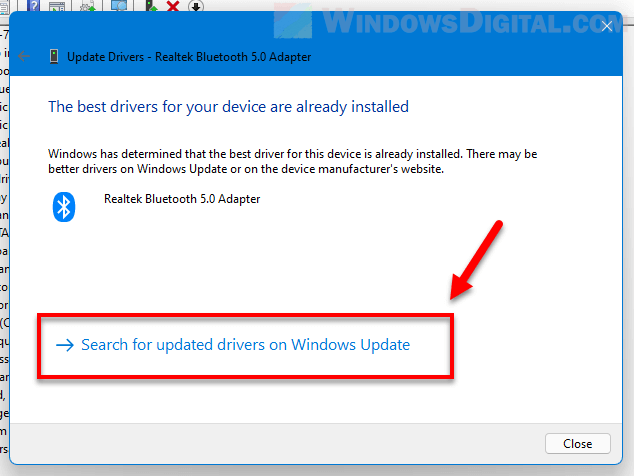
If Device Manager shows “The best drivers for your device are already installed”, select “Search for updated drivers on Windows Update” and run Windows Update. This will allow Windows 11 to automatically search the Microsoft’s driver repository for the best available driver for your Ethernet adapter.
Ethernet adapter not listed in Device Manager in Windows 11
If the Ethernet adapter is not even listed in Device Manager, it might indicate hardware failure issue. You may need to replace your Ethernet adapter. If the broken Ethernet adapter is a built-in part, you can buy a PCIe Ethernet network card (if you have any empty PCIe slot left on your motherboard) or a USB Ethernet adapter instead.
Though extremely rare, it may also be due to that Windows 11 couldn’t detect and find the driver for your Ethernet adapter. In that case, you will have to manually find the driver from the Ethernet adapter manufacturer’s website or by using the driver CD that came with the Ethernet adapter (or your laptop or desktop computer if you bought your PC in full set).
Related guide: How to install or update driver for network adapter in Windows 11
Fix 3: Uninstall and reinstall Ethernet adapter driver
Uninstall a driver is one of the most common solution for many driver related issues in Windows. By uninstalling a driver, on next Windows startup, Windows will automatically attempt to detect, search for, and install the correct and up to date driver for your device.
Doing so will be as if you are freshly plugging in your Ethernet adapter and Windows will automatically detect it and install the right driver for it. Follow the steps below to do so.
1. Go to Start menu, search for and open “Device Manager“.
2. Next, expand the “Network adapters” category. Right-click your Ethernet adapter and select “Uninstall driver“.
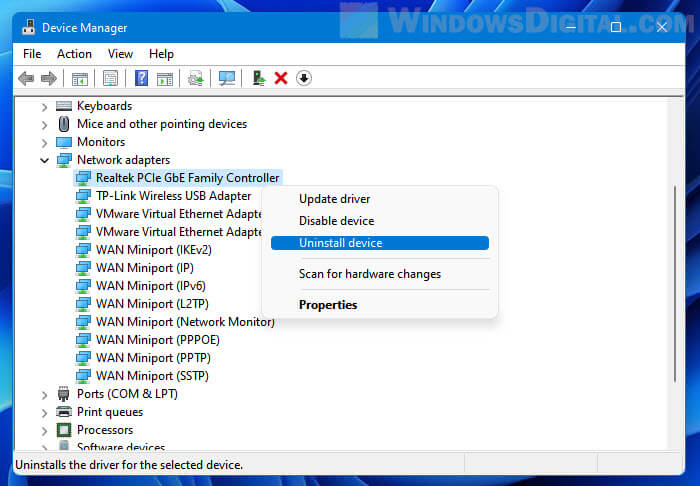
3. When prompted for confirmation, select the checkbox that says “Attempt to remove the driver for this device”, then click Uninstall to proceed.
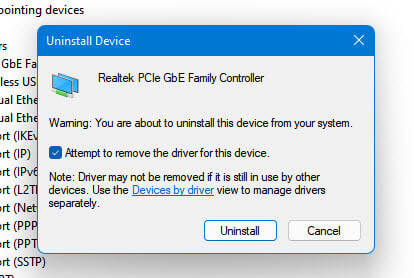
4. After that, restart your computer. On next startup, Windows 11 will automatically detect the Ethernet adapter and install the right driver for it.
Related: How to Uninstall Drivers in Windows 11
Fix 4: Disable and re-enable Ethernet adapter
Another workaround that often fixes network related issues in Windows 11 is to disable and re-enable the Ethernet network adapter via Control Panel. Here’s how.
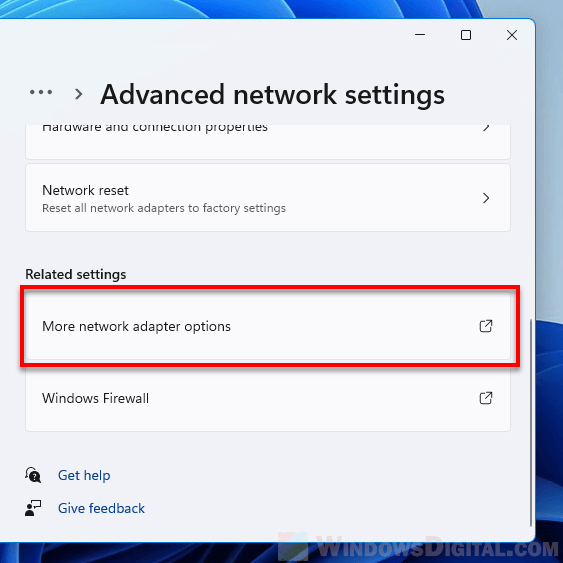
1. Press Win + i to open Settings and navigate to Network & internet > Advanced network settings > More network adapter options.
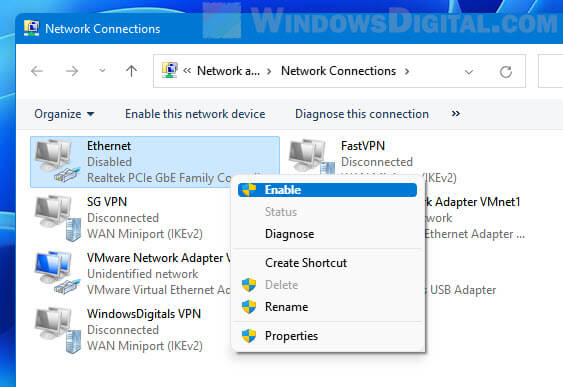
2. In the Network Connections Control Panel window, right-click your Ethernet adapter and select Disable.
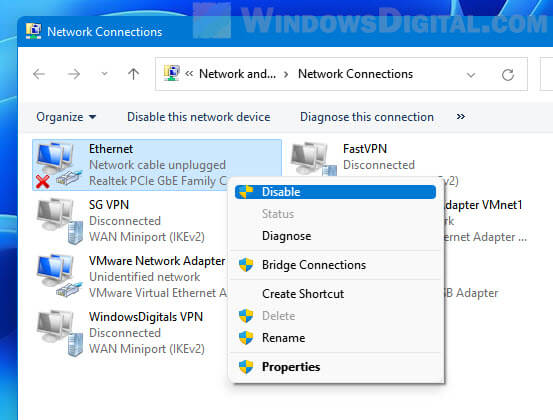
3. Once it’s disabled, right-click it again and select Enable to re-enable it.
Fix 5: Check if your Ethernet adapter is obtaining IP address automatically
If you have incorrect local IP address settings, it may cause IP conflicts within the network and ultimately fail to establish a successful network connection. Check the IPv4 settings of the Ethernet adapter to see if it has the correct IP obtaining settings.
1. Follow step 1 in Fix 4 above to open the Network Connections Control Panel window.
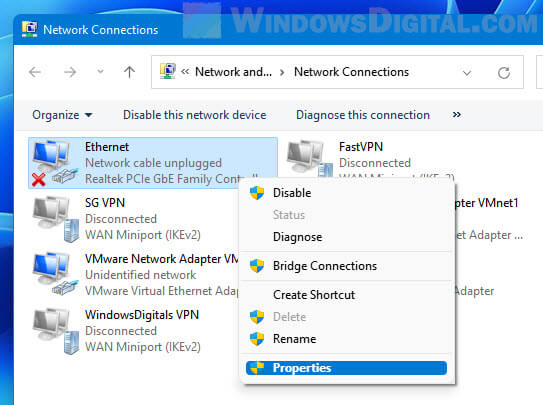
2. Right-click the Ethernet adapter and select Properties.
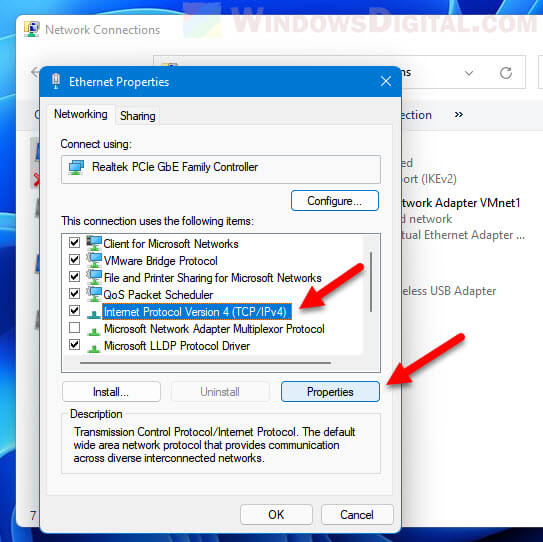
3. Next, in the “This connection uses the following items” section, select “Internet Protocol Version 4 (TCP/IPv4)” and then click Properties.
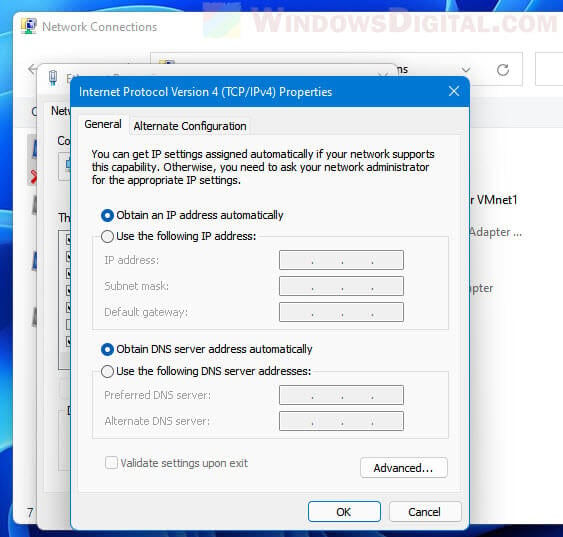
4. If the “Use the following IP address” option is selected, make sure the IP addresses are correct and intended. Before making any changes, jot down the current IP address settings in case you want to undo the changes later. If you have a specific network settings that require these IP settings, leave it as it is. Otherwise, try to select “Obtain an IP address automatically” and click OK.
Fix 6: Run troubleshooters for Network Adapter and Internet Connections
If nothing else works to resolve your Ethernet not working issue in Windows 11, try to run the troubleshooters to let Windows troubleshoot the problem instead. Here’s how.
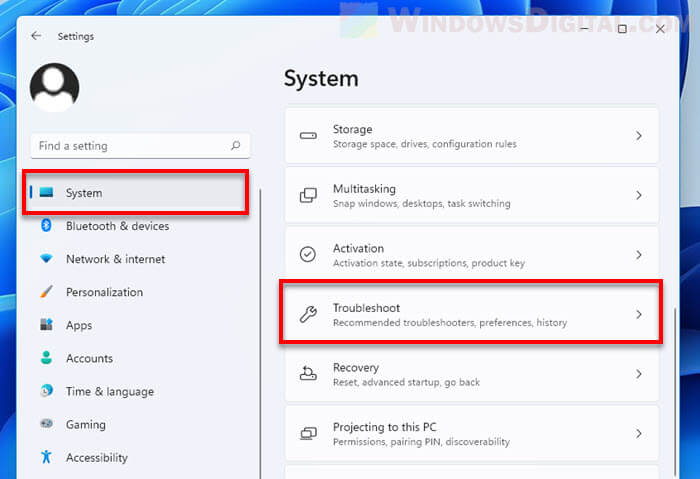
1. First, press Win + i keys to open Settings. In the Settings window, select System from the left pane, and then select Troubleshoot on the right.
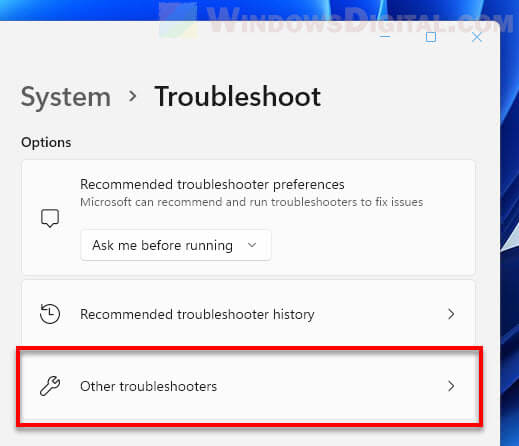
2. Next, select Other troubleshooters.
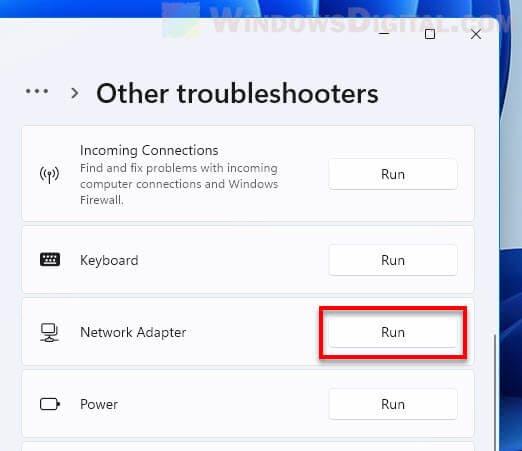
3. In the list of troubleshooters, look for “Network Adapter” and click the Run button next to it to run the troubleshooter for it.
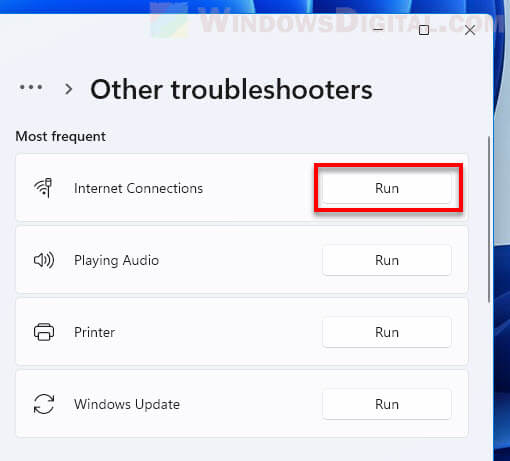
4. If your Ethernet issue also correlates with Internet connections (if your PC currently have no other alternative Internet connection), run the troubleshooter for “Internet Connections” as well.
Fix 7: Reset Network
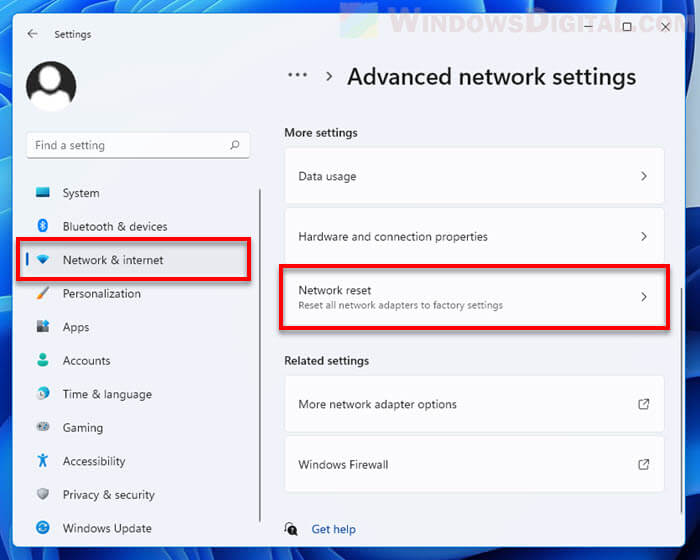
The last resolution would be to try to do a network reset in Windows 11 to reset all network adapters to factory settings.
1. Press Win + i to open Settings, and then navigate to Network & internet > Advanced network settings > Network reset (under “More settings”).
2. Click the Reset now button next to Network reset.
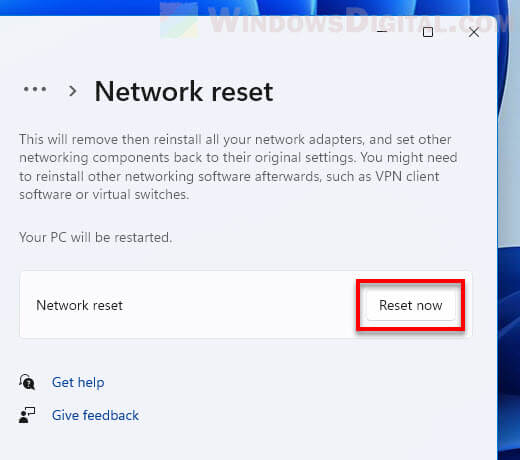
3. Windows 11 will then revert the network settings back to their factory defaults. After reset, restart your computer and retry the Ethernet network connection again.
