VSync, which stands for Vertical Sync, is a graphical technology used for synchronizing the frame rate of a game or app to the refresh rate of a monitor or TV screen. For example, when you run a game which your PC can render 120 frames per second on a 60hz monitor (monitor that can only produce 60 frames per second), if you turn on VSync, you can force synchronize the frame rate of the game with the refresh rate of your monitor, in this case, 60 frames per second.
The purpose of VSync is to eliminate the graphical errors such as screen tearing (a state of the display where you will see a distorted image for a split second) when frame rate of a game is higher than that of your monitor’s refresh rate.
However, VSync also introduces input lag since the frames are being squeezed to fit the refresh rate of a monitor. Input lag is the delay between sending an electrical signal and actual occurrence of a corresponding action. For example, if your game has serious input lag, when you press a button to move your character, there may be a second or two delay until your character actually moves on the display screen.
To fix the input lag issue, users will usually have to disable VSync in the game and/or through NVIDIA Control Panel or AMD Radeon Software if they have a global setting that forces VSync to be turned on for all games and apps in Windows 11. This guide will show you how to turn off VSync entirely in Windows 11.
Tip: If your monitor and graphics card support NVIDIA G-Sync or AMD FreeSync technology, it is recommended you use the new technology instead since it eliminates both the screen tearing and input lag issues.
Read: How to Turn On G-Sync or FreeSync in Windows 11
Page Contents
How to disable VSync entirely in Windows 11
To disable VSync entirely, you should try to turn off VSync in your game first. VSync option can usually be found in the Video or Graphic Settings section in the game.
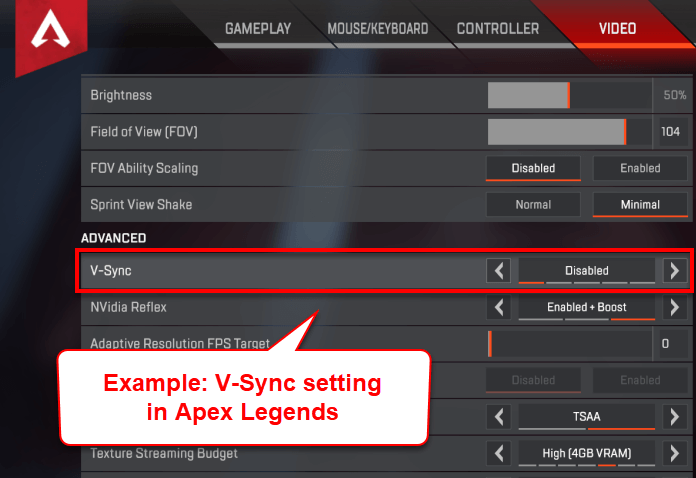
Then, turn off the VSync option through your graphic card’s control panel, depending on what graphics card you are using. See below on how to turn off VSync in Windows 11 through NVIDIA Control Panel for users who have a NVIDIA graphics card, or through AMD Radeon Software if you have a AMD graphics card.
Turn off VSync in NVIDIA Control Panel
To disable VSync via NVIDIA Control Panel, follow the steps below.
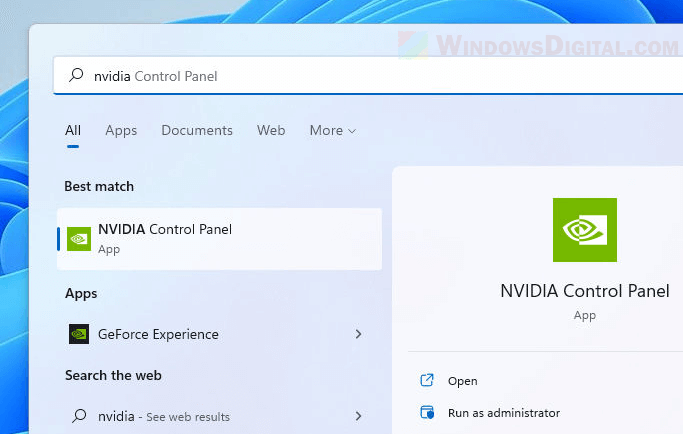
1. In Windows 11, click Start and search for “NVIDIA Control Panel“. Then, select the first result.
2. On the left pane, expand 3D Settings and select Manage 3D settings.
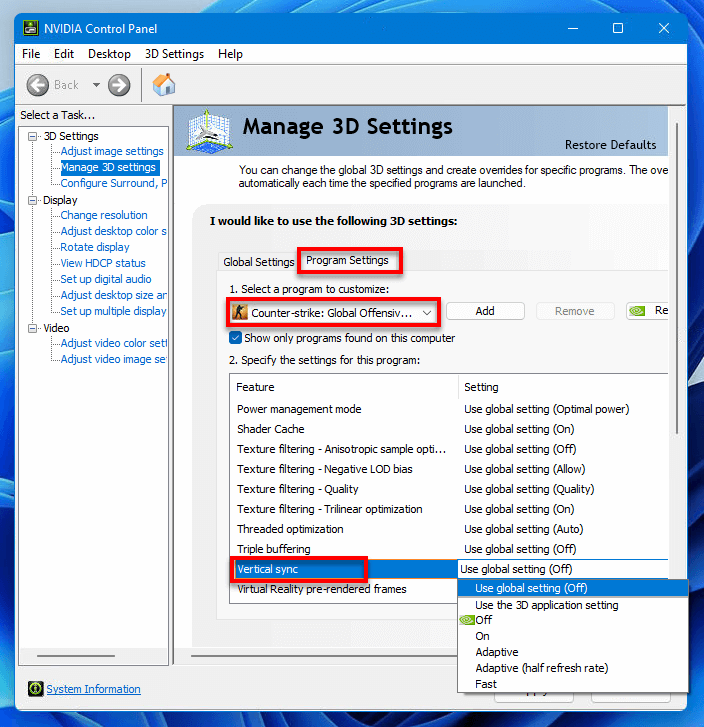
3. In the “I would like to use the following 3D settings” section, select Global Settings tab. Next to Vertical sync setting, click the drop-down menu and select Off. Then, click Apply to save the changes.
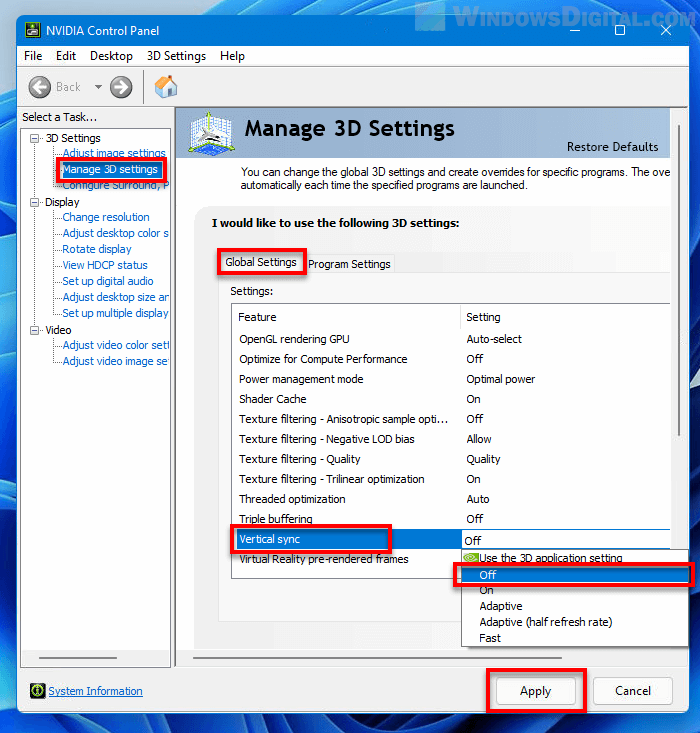
Changing the Vertical Sync option to off for Global Settings will force turn off VSync for all games and apps you run on Windows 11. However, if you have previously set the VSync setting for a specific game or app through NVIDIA Control Panel, it may still have the VSync setting set to On.
To check the VSync setting for a specific game, select Program Settings tab. Under “Select a program to customize”, select the game or app you want to disable VSync for. In the “Specify the settings for this program” section, change the Vertical sync option to either “Use global setting (OFF)” or just “Off“.
Turn off VSync in AMD Radeon Settings
To turn off VSync through AMD Radeon Settings, follow the steps below.
1. Right-click anywhere on your desktop and select Show more options > AMD Radeon Settings.
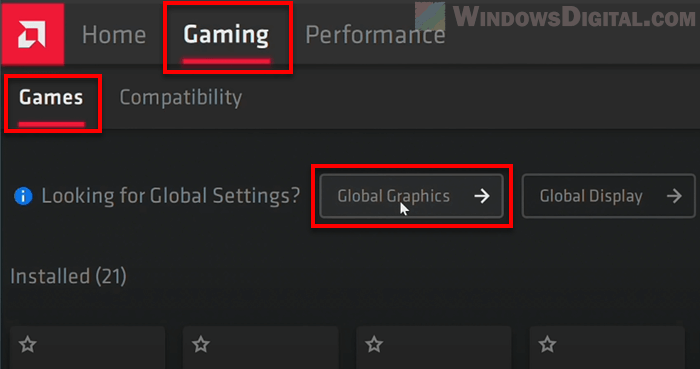
2. In the AMD Radeon Software window, select Gaming > Games. Then, click on Global Graphics.
3. Next, scroll down and look for an option called Wait for Vertical Refresh. Click the drop-down menu next to the vertical refresh option and select Always Off.
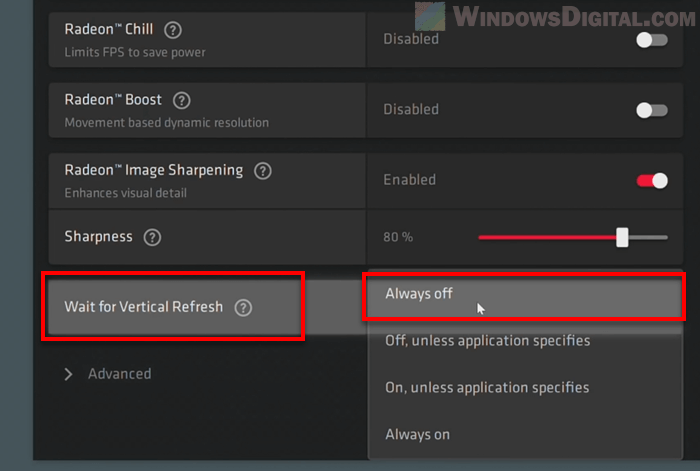
The settings in the Global Graphics will apply to all games and apps. Thus, if you turn off the “Wait for Vertical Refresh” option from there, VSync will always be off for all games and apps you run.
