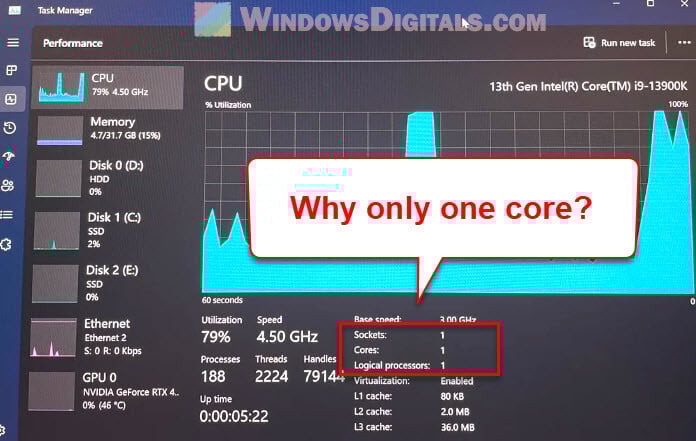
There is a common issue where Windows 11 shows only one processor core even when you’re using a multi-core processor. You might notice this when you open Task Manager and see only a single CPU graph or when the advanced boot options in MSCONFIG only show one processor available. This guide will explain what could cause the issue and how to fix it.
Why does Windows 11 only show one processor core?
There are several reasons why Windows 11 might display only one processor core in Task Manager.
- BIOS settings that disabled multi-core support or hyper-threading.
- Outdated chipset drivers or BIOS firmware.
- Misconfigured system settings such as processor limits in MSConfig.
- Issues during the installation or upgrade of Windows that misconfigure CPU recognition.
Each of these issues can contribute to Windows recognizing fewer cores than are physically present. To fix the issue, we need to look through several areas of your system.
Pro tip: How to Limit CPU Usage of a Process in Windows 11
Update or reinstall your chipset drivers
If your chipset drivers are too old, missing, or incorrect, Windows might not recognize all that your CPU can do. This is especially common if you just upgraded your Windows OS or added new hardware. Chipset drivers are what Windows uses to recognize and communicate with your motherboard and CPU. If these drivers are not up-to-date, Windows might get confused and show the wrong number of CPU cores.
- Visit the manufacturer’s website for your motherboard or computer (if it’s an all-in-one PC).
- Go to the drivers download page, search for the latest chipset drivers for your motherboard or PC model, and download them.

- Install the drivers and restart your PC.
- After restarting, check the Task Manager again to see if it’s showing the correct number of cores under the “Performance” tab.
Linked issue: Laptop CPU (Processor) Stuck at 0.40 GHz, Why?
Check the BIOS settings
The BIOS (Basic Input/Output System) controls your hardware settings, including the number of CPU cores your computer can actually use. Sometimes, settings related to multi-core support or hyper-threading can be disabled in the BIOS, which causes Windows to detect only one core. Here’s what you should do:
- Restart your computer.
- Press the appropriate key (often F2, Delete, or Esc) to enter the BIOS during boot-up.

- Go to the CPU Configuration or Advanced Settings section. Note that different motherboard brands have different user interfaces, but the wording of the settings is usually similar.
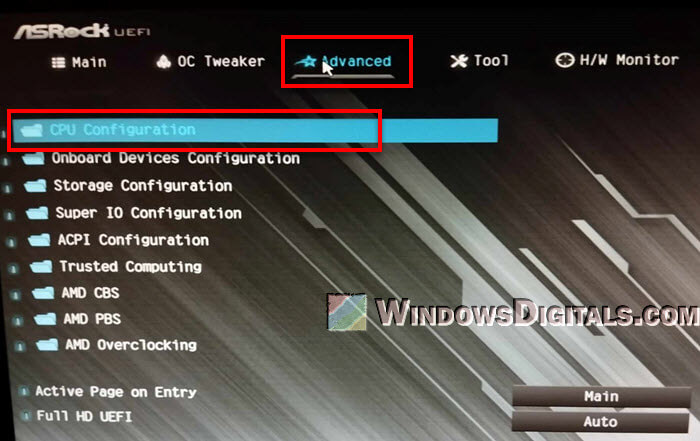
- Look for options like Active Processor Cores, Multi-Core Support, or Hyper-Threading.
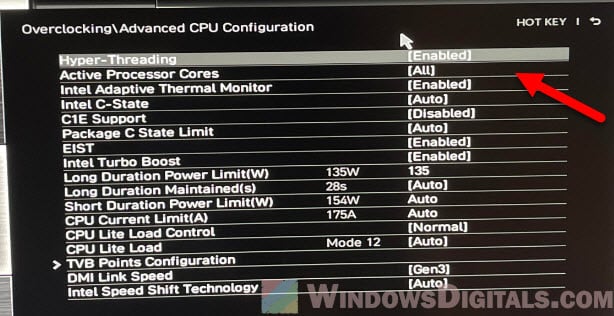
- Make sure that all available cores are enabled, and Hyper-Threading is also turned on (if applicable).
- Save your changes and exit the BIOS (usually by pressing F10).
After making these changes, boot back into Windows 11 and check Task Manager to see if all cores are now detected.
If you can’t find the options mentioned, and if you don’t have any custom settings in the BIOS, you can try resetting the BIOS to its factory defaults and see if it helps.
Also see: How to Clear CMOS without Removing Battery or Jumper Cap
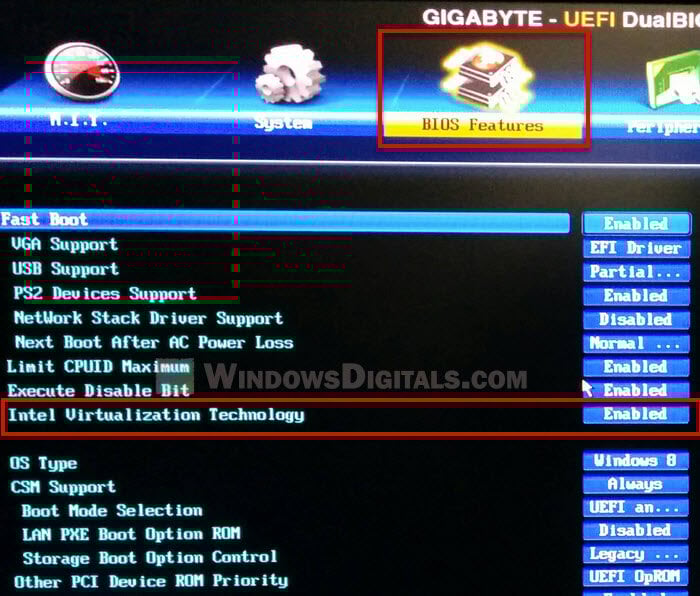
Try disabling virtualization settings
Certain virtualization technologies, such as Intel VT-x or AMD-V, may cause core detection issues. Try disabling any unnecessary virtualization features to see if this resolves the core detection issue.
Update your BIOS firmware
There could also be a bug or outdated version of BIOS that causes the firmware and the OS to only detect a single core. There are many cases where simply updating the BIOS firmware to the latest version (usually with bug fixes and improvements) can potentially fix the issue of only one core being detected.
Be warned: A BIOS update can be a very risky process if you’re not careful or don’t know well enough to do it. A failed or interrupted update caused by a power outage, or incorrect firmware flashing, can brick your motherboard, rendering it completely unusable. You need to follow the manufacturer’s instructions very carefully and only try updating your BIOS if you’re confident about it. If you’re not sure what you’re doing, it’s better to just get someone to help you instead.
- Go to your motherboard manufacturer’s website and find the latest BIOS version.
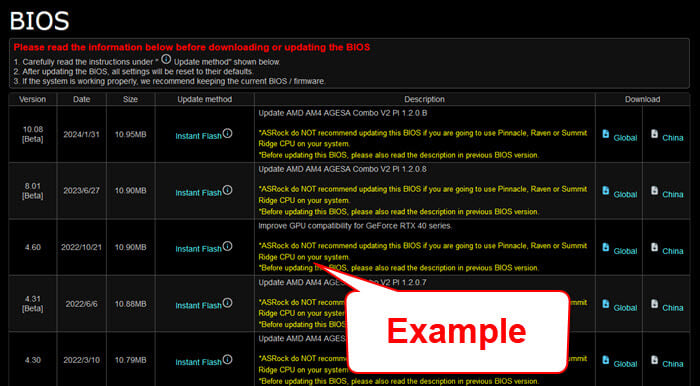
- Follow the instructions to flash the BIOS. This process usually involves downloading the BIOS file to a USB drive and using your motherboard’s built-in update or flashing tool.
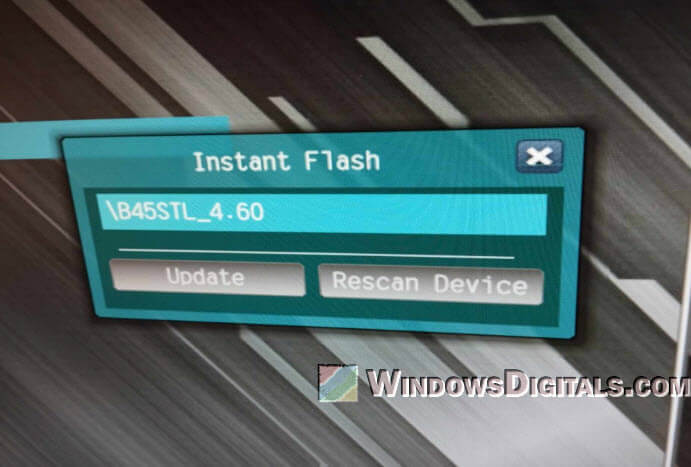
- After the update, check Task Manager to see if the issue is resolved.
Related concern: Windows 11 Not Activated After BIOS Update
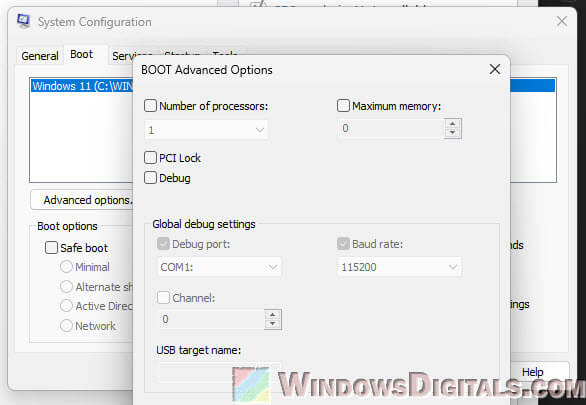
Remove core limits in MSCONFIG
The “System Configuration” tool (MSconfig) has a setting that allows you to limit the number of CPU cores available at boot. This setting can be enabled or disabled. When enabled, you can select however many processor cores you want Windows to boot with, but disabling it will allow Windows to use all cores available.
Even if you’re seeing only one processor core in the dropdown of the “Number of processors” option, you should try unchecking the limit and see if Windows can see all your cores.
- Press Win + R to open the Run dialog box.
- Type “msconfig” and press Enter.

- In the System Configuration window, go to the Boot tab and click Advanced Options.
- If “Number of processors” is checked, uncheck it.
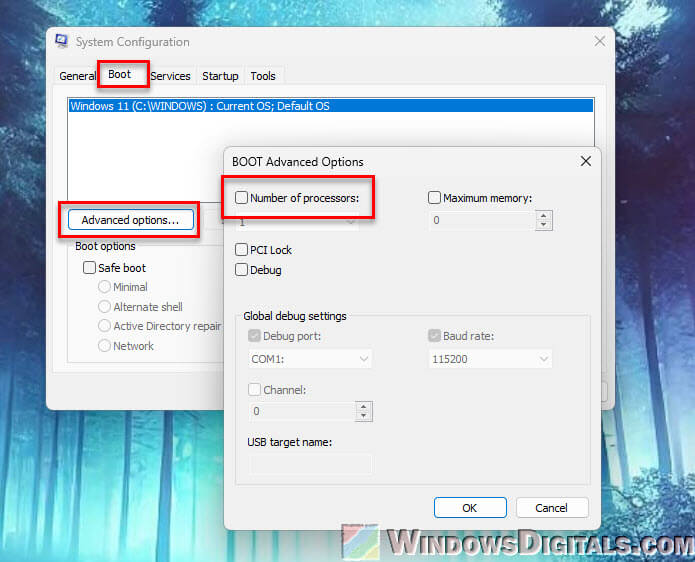
- Click OK and restart your computer.
Might be useful: How to Reduce Hardware Reserved Memory in Windows 11/10
Use a third-party tool like EasyBCD
If changing the settings in MSConfig doesn’t work, you can use third-party software like EasyBCD to reset Windows’ CPU configuration. EasyBCD is primarily a boot manager but has a developer tool for controlling CPU limits, which can sometimes fix CPU misdetection issues.
- Download EasyBCD from its official site.
- Open the application and go to “Advanced Settings“.
- Go to the “Developer” tab and find the option “Limit Windows to xx CPUs“.
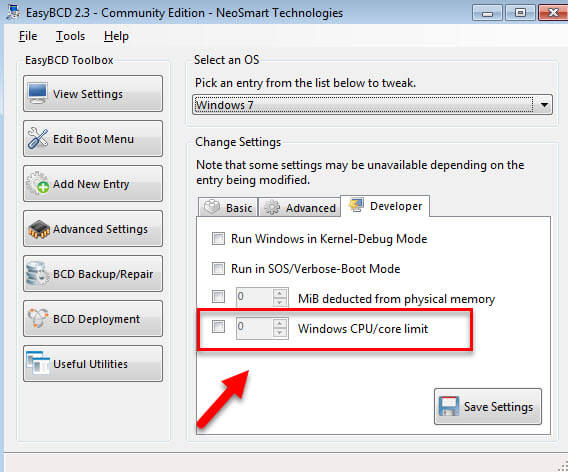
- Set this value to “0” (zero), which will allow Windows to use all available CPU cores.
- Shut down your computer completely and then power it back on. Check Task Manager to see if it’s showing all your cores correctly.
Try uninstalling the CPU in Device Manager
Yes, this might sound a little bit silly, but it’s what you should usually do when a device misbehaves, including even the CPU. If updating the chipset driver as mentioned earlier did not resolve the issue and driver issue is still a suspect, you can try uninstalling the processor (CPU) in Device Manager and see if it resolves the issue.
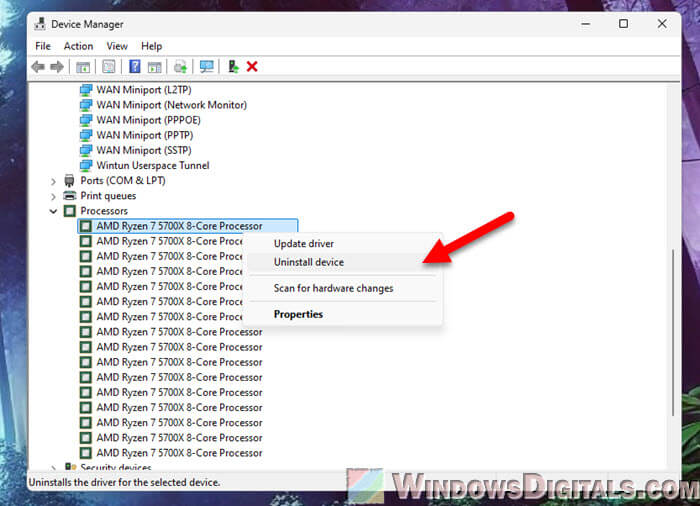
When you uninstall the CPU through Device Manager in Windows, you’re not really deleting a driver for the CPU. What you’re doing is making Windows re-scan the system’s hardware again. If it finds that the driver for the CPU is missing on the next restart, it’ll automatically look for and download the latest and most appropriate driver for your CPU from Microsoft’s driver repository, and reinstall it on boot up. This will fix any issues that were caused by incorrect or missing drivers.