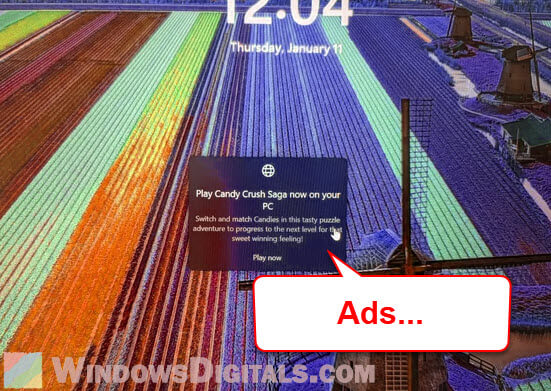
Are you seeing those random annoying Microsoft Shop ads on your Windows 11 welcome lock screen when you start up your PC? Well, they can sometimes be quite distracting because these ads often block a huge part of the beautiful pictures displayed by Windows Spotlight (the lock screen photos). If you’re wondering how to remove these ads, you’ve come to the right place.
Windows Spotlight is a feature in Windows 11 and 10 that shows random images from around the world on your lock screen (the screen before you sign into your account and get to the desktop), and sometimes includes ads for Microsoft products like Edge or Bing. It can be disappointing to see these ads when you’re just trying to start your day. But there’s a straightforward way to stop these ads from appearing on the welcome screen, and I’ll show you how.
Page Contents
Switch off Windows Spotlight
To stop seeing the ads on your lock screen, you’ll want to change a setting in your Windows operating system. This is a simple adjustment that can make your lock screen ad-free:
- Open your Settings menu by clicking on the Start menu and selecting the gear icon, or just type “Settings” in the search bar next to the Start menu.
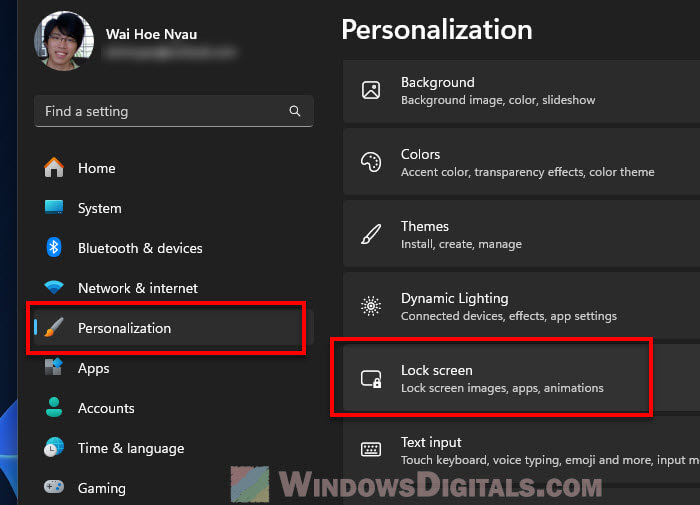
- In the Settings menu, go to Personalization. This section lets you customize how your computer looks.
- Click on Lock screen. Here you will see different options related to what shows up on your lock screen when you start up your computer.
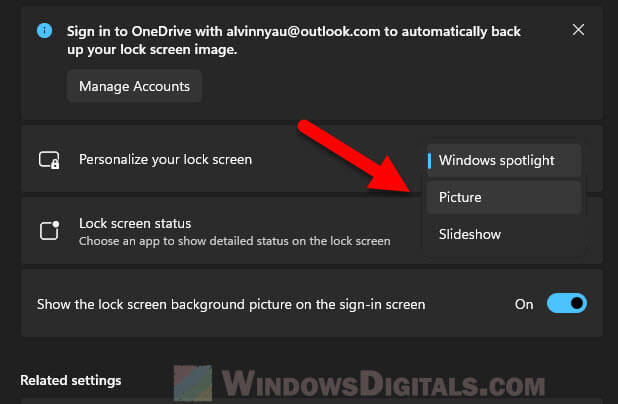
- Under the heading that says Personalize your lock screen, you’ll see an option for Windows Spotlight. This is currently selected if you’re seeing random images and ads.
- Change this setting from Windows Spotlight to Picture or Slideshow if you prefer to have your own photos.
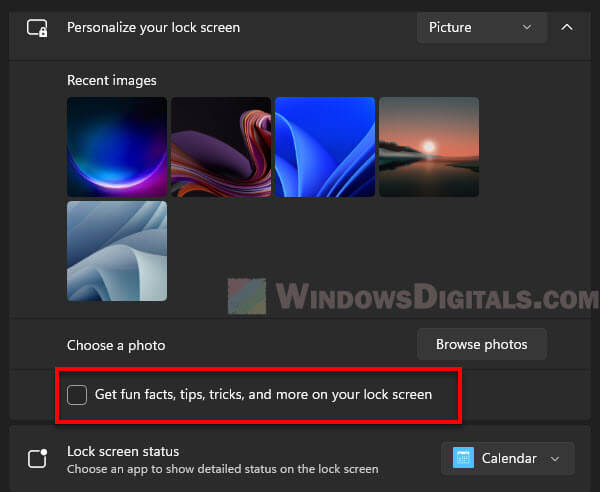
Pro tip: If you select “Picture” or “Slideshow”, you might also want to disable the checkbox that reads “Get fun facts, tips, tricks, and more on your lock screen” to remove any unnecessary items and texts that look just like ads even when you’re running your own pictures for your lock screen.
By switching away from Windows Spotlight, you will no longer see the Microsoft ads. But, keep in mind that this means you also won’t see the random beautiful images that Windows selects for you. If you still want to enjoy these images without the ads, unfortunately, there isn’t a permanent fix as of now, but some users suggest third-party tools or occasional registry edits which may need to be reapplied after updates.
Also see: Finding out the location of the Windows 11/10 lock screen image
Turn off other unwanted features and ads
Windows often includes many other promotional messages and suggestions in different parts of the system. To minimize these:
- Like before, access the Settings menu.
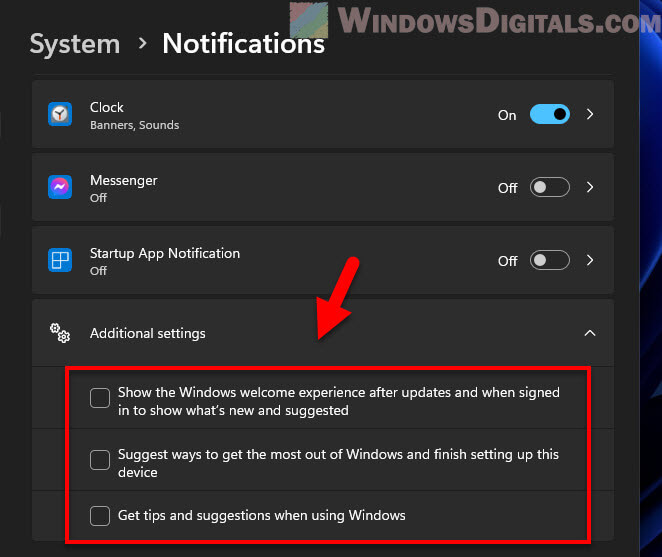
- Go to System, then Notifications & actions:
- Scroll down to the Additional settings. Here, you can turn off tips and suggestions that Windows displays.
Might be useful: How to disable desktop pop-up notifications on Windows 11
Try to use the OFGB tool to remove ads
If you’re searching for a powerful way to remove ads in Windows 11, the OFGB (Oh Frick Go Back) tool could be just what you need. This tool helps get rid of ads across different parts of Windows 11. It’s designed with a user-friendly graphical interface, which makes it simpler to use compared to tools that rely on the command line.
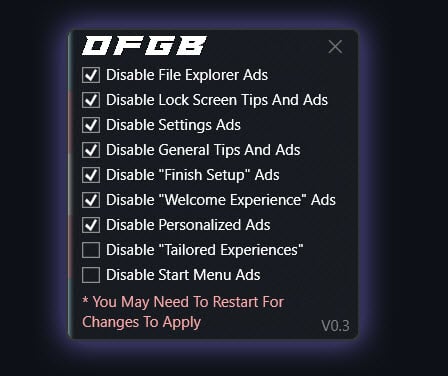
You can download OFGB by going to its GitHub repository. Be aware that, like with any third-party software, you should use it carefully and be aware of how it changes your system settings. Be sure to download the most recent version to get the most current fixes that actually works.
To learn more or to get the tool, check out the OFGB GitHub page.
Try the Chris Titus’ tool
If you’re looking to disable more than just ads, such as unnecessary services and bloatware that act like ads, you can try using a famous tool made by Chris Titus. It’s a very well known tool among the tech community because of its ability to easily tweak settings related to built-in apps, bloatware, and other quality of life features.
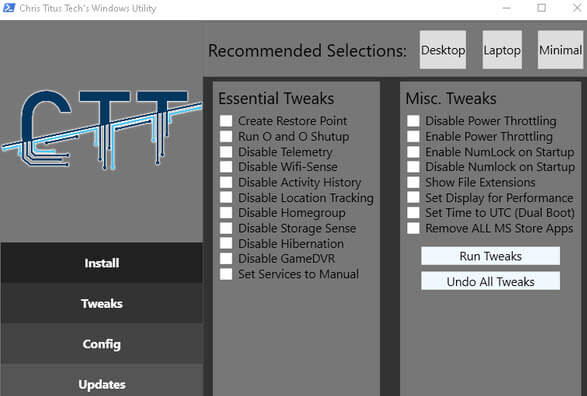
You can download and use the tool by simply running a single line of command in an elevated PowerShell window (run as admin):
iwr -useb https://christitus.com/win | iex
After running the command, you will see a window popping up with many checkboxes to tick or untick. These are all the features you can enable or disable in Windows. Go to the “Tweaks” section, and you should see things that you can disable (disabling all at once is NOT recommended). Select the changes you want and click “Run Tweaks” to apply them.
Like with any other third-party tool, you should use it with extra caution. Though Chris Titus is a respected name in the tech community, and his tool is designed to be safe and user-friendly, it’s still a good practice to create a system restore point first before you make any changes, just in case things you don’t expect happen.
